
The 3-minute cold brew revolution
For years, cold brew meant patience – a 12 to 24-hour steeping process. It was a commitment. Now, there’s a faster way to get that smooth, low-acid coffee we love. Flash cold brew is changing the game, delivering professional-quality results in just three minutes. It might sound too good to be true, but it isn’t.
This isn't about sacrificing quality for speed. The method uses rapid extraction with chilled water. I've found the results are as good as the 24-hour version, which is a relief when you want a drink immediately.
Making this at home is simple once you get the grind and the water temperature right. You don't need a professional setup to get cafe-quality results in your own kitchen.
How flash brew works
Traditional cold brew relies on extended steeping times to extract flavor from coffee grounds. This long immersion results in a concentrated brew that's then diluted with water. Flash cold brew, however, uses a much shorter extraction time – typically around 30-60 seconds – and relies on a higher coffee-to-water ratio to achieve a similar concentration.
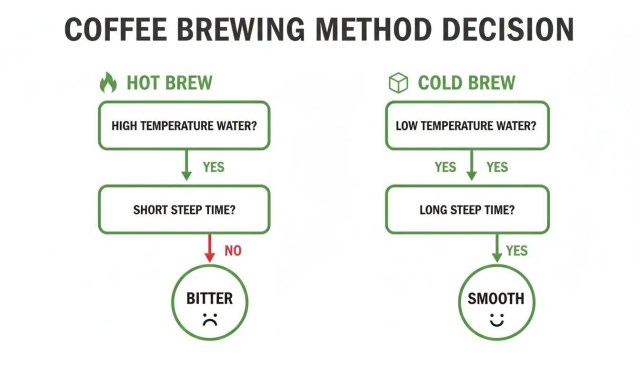
The rapid chilling inherent in flash brewing impacts the extraction process in significant ways. It minimizes the extraction of certain acids and oils that contribute to bitterness, resulting in a smoother, sweeter cup. It’s not just about speed, it’s about how the flavors are extracted. The quick process also tends to preserve more delicate aromatics.
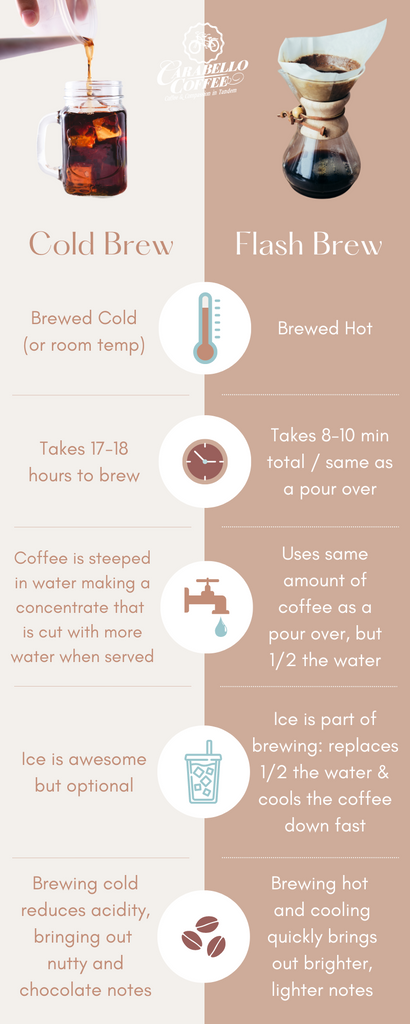
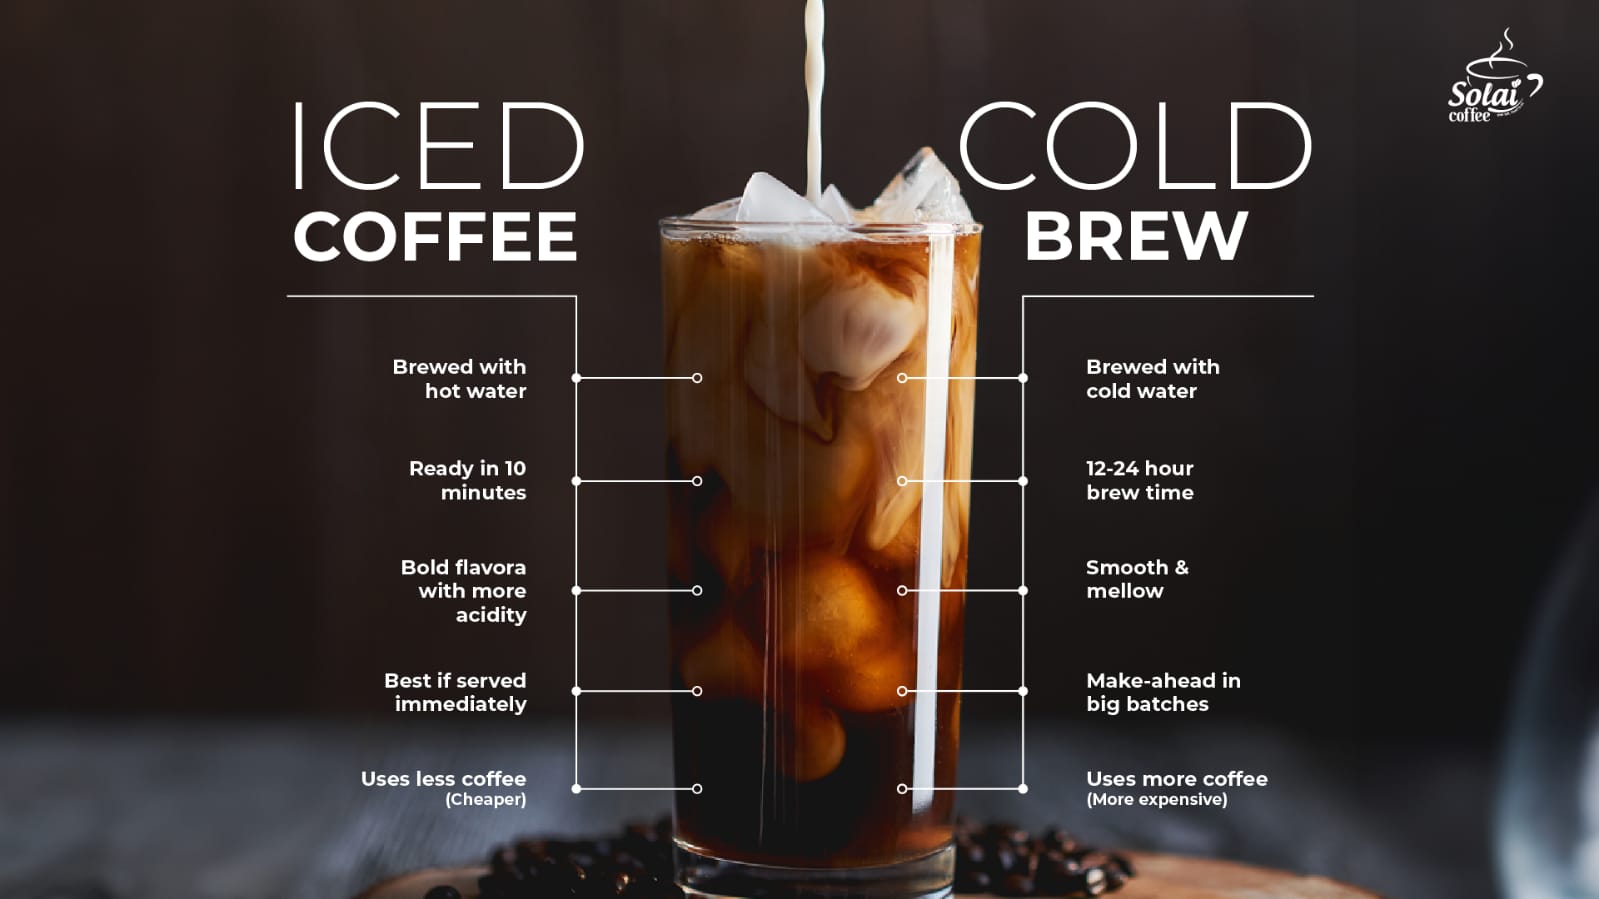
Now, let's be clear: flash cold brew is not the same as iced coffee. Iced coffee is typically hot brewed coffee that's cooled down, often over ice. This process can dilute the coffee and create a more acidic, sometimes bitter, flavor profile. Flash cold brew bypasses the heat entirely, resulting in a fundamentally different beverage. It's more akin to a concentrated cold brew that you’d dilute, but made instantly.
Picking the right beans
The beans you pick matter. I generally recommend medium to dark roasts. They are smoother and less acidic when chilled quickly, and the flavor is bold enough that it won't disappear if you add ice or milk.
According to Sky Cold Brew’s guide on best beans (skycoldbrew.com), darker roasts often have a naturally lower acidity, which complements the already low-acid nature of cold brew. They highlight beans from Sumatra and Brazil as excellent choices. I’ve found that a good Guatemalan can also deliver a fantastic flash brew.
I’m not entirely convinced that single-origin beans are necessary for flash cold brew. A well-balanced blend can be just as satisfying, and often more affordable. However, if you’re looking to add complexity and nuance, a high-quality single-origin bean can certainly elevate your brew. Just be mindful of the inherent flavor profile – a bright, fruity Ethiopian might not be the best choice if you prefer a chocolatey, nutty flavor.
- Sumatra beans are earthy and full-bodied.
- Brazilian varieties are nutty and chocolatey with low acidity.
- Guatemalan coffee is balanced and chocolatey with hints of fruit.
Bean Profile Suitability for Flash Cold Brew
| Bean Profile | Flavor Profile | Acidity | Body | Ease of Use |
|---|---|---|---|---|
| Light Roast | Bright, Floral, Fruity | High | Light | Good |
| Medium Roast | Balanced, Nutty, Chocolatey | Medium | Medium | Excellent |
| Dark Roast | Bold, Smoky, Bittersweet | Low | Full | Fair |
| Single-Origin (Ethiopian Yirgacheffe) | Floral, Citrus, Tea-like | High | Light-Medium | Good |
| Single-Origin (Sumatran Mandheling) | Earthy, Herbal, Chocolate | Low | Full | Fair |
| Blend (Central/South American) | Balanced, Chocolate, Caramel | Medium | Medium-Full | Excellent |
| Blend (Espresso Blend) | Rich, Intense, Chocolatey | Medium-High | Full | Good |
Illustrative comparison based on the article research brief. Verify current pricing, limits, and product details in the official docs before relying on it.
Grind size and water ratios
Precision is key when it comes to flash cold brew. The grind size and coffee-to-water ratio have a significant impact on the final flavor. Generally, you want a grind that's coarser than drip coffee, but finer than French press. Think somewhere in between – about the consistency of coarse sand.
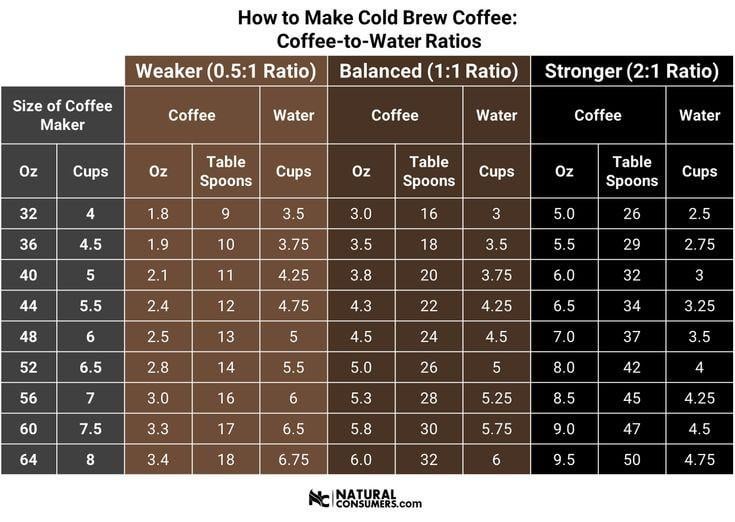
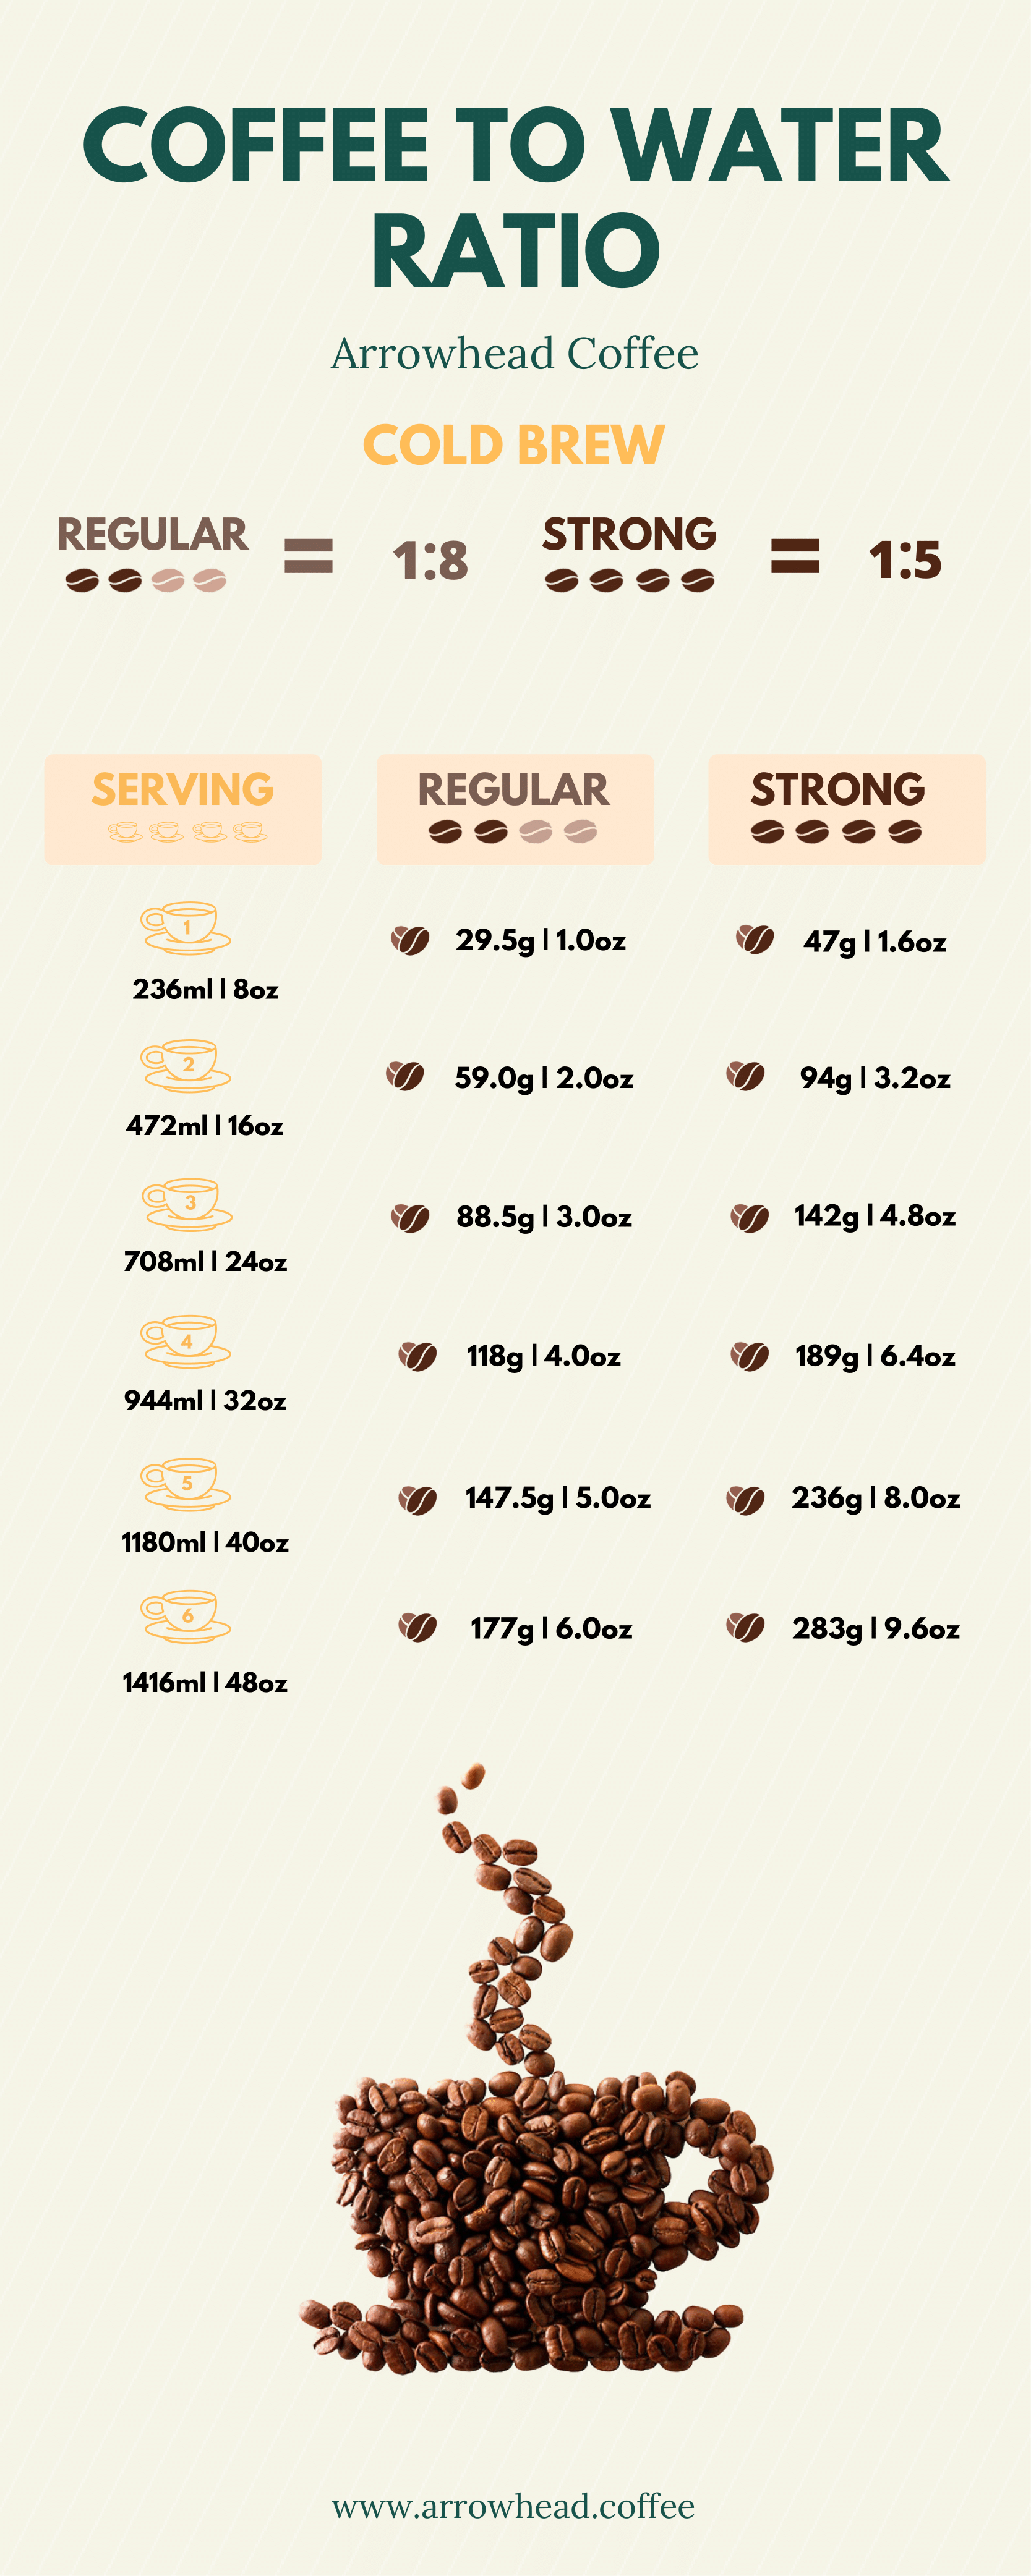
The coffee-to-water ratio is where you have the most control over the strength of your brew. A good starting point is 1:8 or 1:10 (coffee to water by weight). This means for every 1 gram of coffee, you’ll use 8-10 grams of water. I personally prefer a 1:7 ratio for a really concentrated brew that I dilute with more water or milk.
Don't be afraid to experiment! If your brew is too weak, use a higher ratio (e.g., 1:6). If it’s too strong or bitter, use a lower ratio (e.g., 1:12). Small adjustments can make a big difference. Investing in a kitchen scale is a must for consistent results. It's the single most important piece of equipment, aside from the coffee itself.
If you use 20 grams of coffee at a 1:7 ratio, you need 140 grams of water. For a 1:10 ratio, use 200 grams. Keeping a simple scale nearby is easier than guessing.
Pour-over vs. immersion
There are two main approaches to flash cold brew: pour-over and full immersion. The pour-over method involves slowly pouring chilled water over coffee grounds, similar to making drip coffee. The immersion method involves fully submerging the grounds in chilled water for a short period.
Pour-over, using a device like a Hario V60 or Chemex, offers greater control over the extraction process. You can adjust the pour rate and water temperature to fine-tune the flavor. However, it requires a bit more technique and attention. It does take practice, but the control is worth it, in my opinion.
Immersion, using a Clever Dripper or AeroPress, is simpler and more forgiving. You simply add the coffee and water, stir, and let it steep for a short time. It's a great option for beginners or those who prefer a hands-off approach. The AeroPress, in particular, is very versatile.
The flavor profile can differ slightly between the two methods. Pour-over tends to produce a cleaner, more nuanced cup, while immersion can result in a bolder, more full-bodied brew. Ultimately, the best method depends on your personal preference and desired flavor profile.
How to make pour-over flash brew
Here’s a detailed guide to making flash cold brew using the pour-over method. You’ll need a pour-over device (Hario V60 is popular), a paper filter, chilled water, freshly ground coffee (coarse-medium grind), and a scale. I recommend using filtered water for the best flavor.
First, place the paper filter in the pour-over device and rinse it with hot water to remove any papery taste. Discard the rinse water. Then, add your coffee grounds to the filter. I usually start with 20 grams of coffee.
Next, perform a bloom by pouring about 40 grams of chilled water over the grounds, ensuring they are evenly saturated. Let it bloom for 30 seconds. This allows the coffee to degas and release trapped carbon dioxide.
After the bloom, continue pouring the remaining water (around 140-160 grams for a 1:7 ratio) in a slow, circular motion, ensuring all the grounds are evenly extracted. Aim for a total brew time of around 2-3 minutes. If it’s taking significantly longer, your grind might be too fine. If it’s too fast, it might be too coarse.
Fixing common problems
Even with a precise method, things can sometimes go wrong. If your flash cold brew is weak, the most common culprit is an insufficient coffee-to-water ratio. Try using more coffee or less water. Another possibility is that your grind is too coarse, resulting in underextraction.
If your brew is bitter, it could be due to overextraction. Try using a coarser grind, reducing the brew time, or using a lower water temperature. I once made a batch that was incredibly bitter because I accidentally used hot water – a rookie mistake!
Uneven extraction, often indicated by channeling (where water flows through the grounds unevenly), can be addressed by ensuring the grounds are evenly saturated during the bloom and pour. A gooseneck kettle is helpful for precise pouring. Make sure you're not disturbing the coffee bed too much while pouring.
Don't get discouraged if your first few attempts aren't perfect. Flash cold brew takes practice. Keep experimenting with different variables until you find what works best for your beans and your taste preferences.
No comments yet. Be the first to share your thoughts!