
Beyond the French Press: Why Explore?
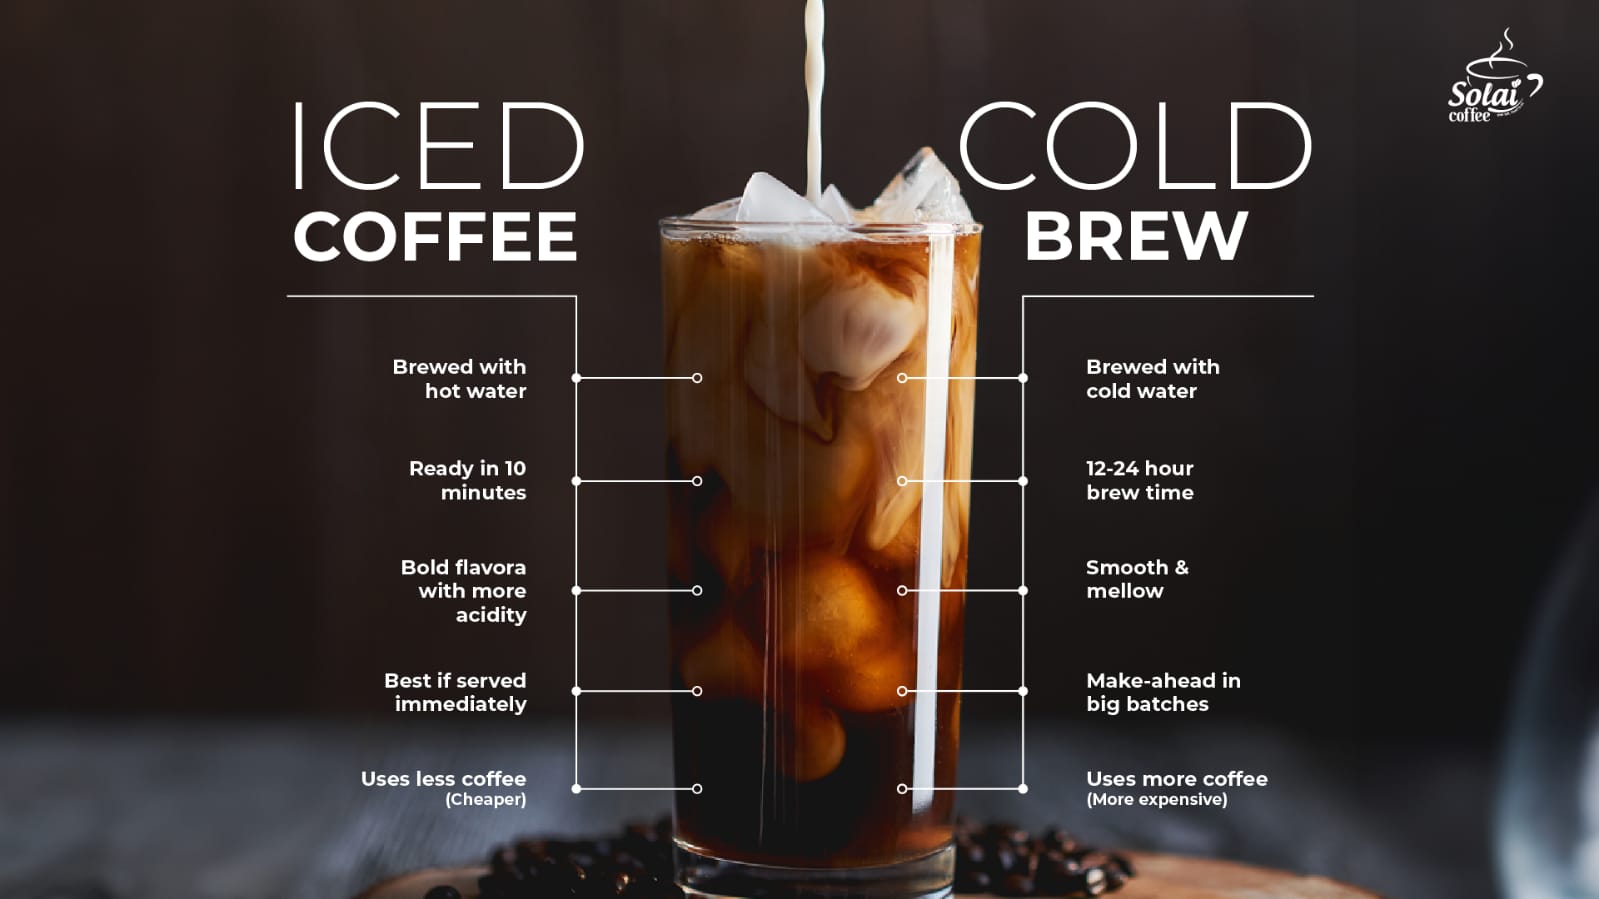
Cold brew has exploded in popularity, and it’s easy to see why. The lower acidity, naturally sweet flavor, and concentrated strength make it a fantastic alternative to traditional iced coffee. For a long time, the French press was the go-to method for making it at home, but it’s certainly not the only way. Maybe you don’t own a French press, or perhaps you’re looking for a different flavor profile, or even just a less messy process.
The truth is, you can make excellent cold brew with equipment you likely already have in your kitchen. Exploring methods beyond the French press opens up a world of possibilities, allowing you to tailor the process to your preferences and lifestyle. It’s about accessibility, convenience, and frankly, having some fun experimenting. Don’t let a lack of specialized gear hold you back from enjoying a delicious glass of cold brew.
We've seen a real shift in how people approach cold brew. It's moved beyond being a barista-only drink and become a staple in many homes. This has led to a demand for simpler, more versatile brewing techniques, and that’s what we’re going to explore. It’s a surprisingly approachable process, even for beginners.
The Mason Jar Method: Simple & Reliable
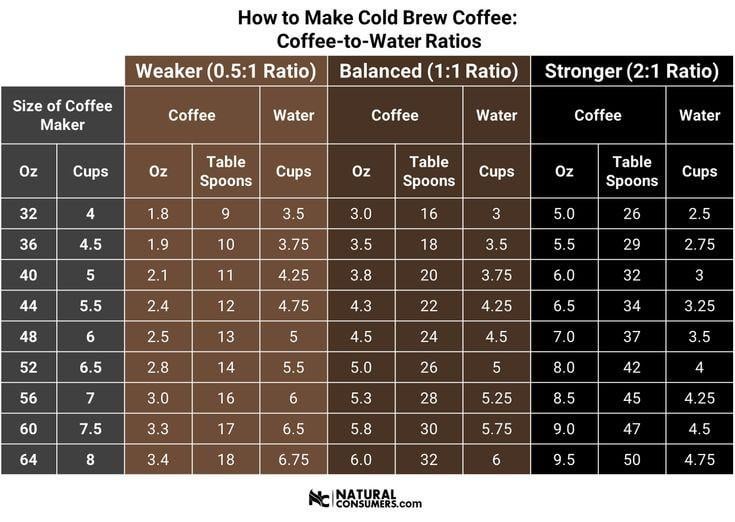
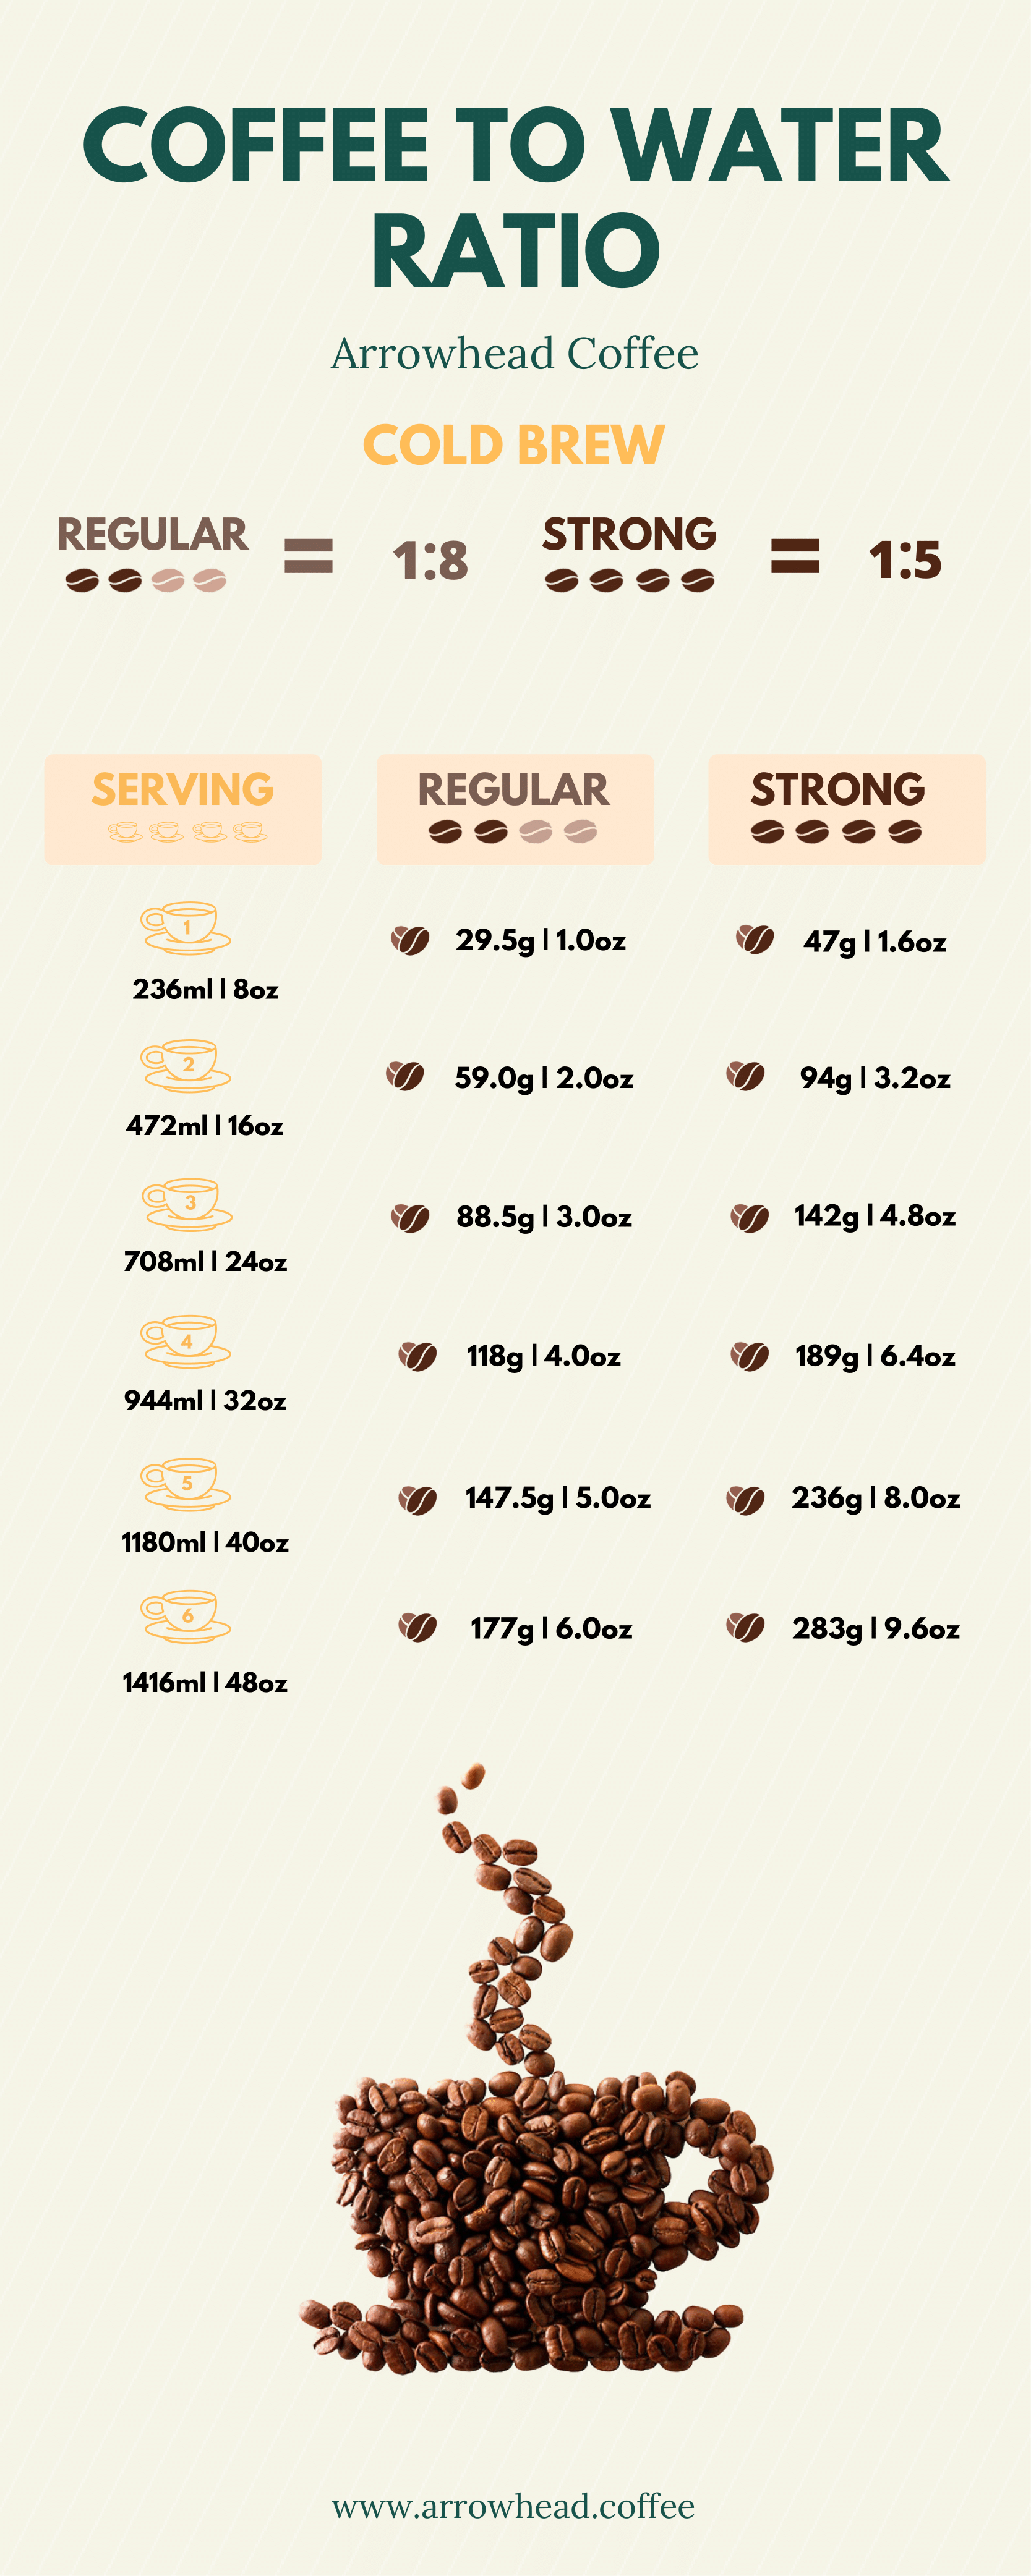
The mason jar method is the quintessential starting point for home cold brew. It's incredibly straightforward – you really don’t need much more than a jar, coffee grounds, and water. A good starting ratio, as recommended by Simply Recipes, is 1:8 coffee to water by volume. So, one cup of coarsely ground coffee to eight cups of water is a solid place to begin.
Coarse grinding is key here. Think French press grind – you want larger particles to avoid a muddy, over-extracted brew. Combine the coffee and water in the mason jar, stir gently to ensure all the grounds are saturated, and then let it steep in the refrigerator for 12 to 24 hours. The longer the steep, the stronger the concentrate will be.
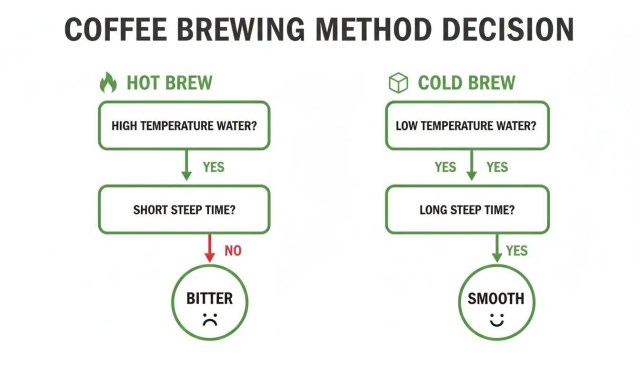
The pros are obvious: it's cheap, requires minimal equipment, and is incredibly easy. However, there are a few drawbacks. Sediment is a common issue, and you’ll likely need to filter the concentrate thoroughly. There’s also a risk of over-extraction if you leave it steeping for too long, resulting in a bitter taste. But for a first attempt, it’s a fantastic way to understand the fundamentals.
Pour-Over Power: Adapting Your Existing Gear
If you already own a pour-over device, like a Hario V60 or Chemex, you’re already halfway to making excellent cold brew. The principle is similar to the mason jar method – immersion – but the paper filter provides a much cleaner result. You’ll want to use a similar coffee-to-water ratio, around 1:8, and a coarse grind.
The key difference lies in the brewing process. Instead of simply combining the coffee and water, you’ll slowly and evenly saturate the grounds, ensuring they’re all wet. Let it sit for that 12-24 hour period, just like with the mason jar method. The paper filter will trap most of the sediment, giving you a noticeably cleaner cup.
This method does require a bit more attention than just letting it sit in a jar. You need to be mindful of the saturation process, making sure all the grounds are evenly exposed to the water. It also takes a little longer, as you need to manually pour the water over the grounds. However, the resulting clarity and flavor are well worth the extra effort. It’s a great step up from the mason jar method for those seeking a cleaner brew.
I’ve found that using a slightly longer steep time – closer to 24 hours – with the pour-over method can really bring out the nuanced flavors of the coffee. It’s a little more involved, but the control you have over the extraction is significant. Plus, you’re repurposing equipment you likely already own!
- Grind coffee coarsely.
- Place a paper filter in your pour-over device.
- Add coffee grounds to the filter.
- Slowly pour cold water over the grounds, ensuring even saturation.
- Let steep for 12-24 hours in the refrigerator.
- Remove the filter and enjoy!
The Cold Brew Bag: Mess-Free Immersion
Reusable cold brew bags, available from places like Sky Cold Brew, offer a convenient and mess-free way to make immersion cold brew. These bags contain the coffee grounds during the steeping process, eliminating the need for messy filtering later on. They’re essentially a more refined version of the mason jar method.
Different materials impact flavor. Nylon bags are durable and easy to clean, while muslin bags offer a slightly more porous filter, potentially allowing for a bit more flavor to pass through. The choice depends on your preference – I generally prefer nylon for its ease of use and consistent results.
Using a cold brew bag is incredibly simple: add the coffee grounds to the bag, place it in a pitcher of water, and let it steep. This is a great option for those who want the convenience of a pre-filtered system without sacrificing the quality of immersion brewing. It’s a solid middle ground between the simplicity of the mason jar and the precision of the pour-over.
Immersion with a Pitcher & Strainer
This method is very similar to the mason jar technique, but utilizes a pitcher for brewing and a fine-mesh strainer or cheesecloth for filtration. Combine your coarsely ground coffee with water in the pitcher, using a 1:8 ratio as a starting point. Allow the mixture to steep in the refrigerator for 12-24 hours.
The key here is a good strainer. A fine-mesh strainer will do a decent job of removing sediment, but cheesecloth provides an even cleaner result. This method offers a more controlled pouring experience compared to the mason jar, which can be helpful when you’re ready to filter the concentrate. It's a good stepping stone if you're considering more specialized equipment.
It’s a simple upgrade that improves the filtering process and makes serving a little easier. I find it’s a good option for those who want a slightly more refined experience without investing in a dedicated cold brew system.
The Clever Dripper Hack: A Unique Approach
The Clever Dripper is typically used for pour-over coffee, but it can also be cleverly repurposed for cold brew. Its unique valve allows for full immersion – letting the coffee steep directly in the water – and then a clean release when you’re ready to filter. This combines the benefits of immersion brewing with the convenience of a built-in filter.
The process is straightforward: add your coarsely ground coffee to the Clever Dripper, pour in cold water, and let it steep for 12-24 hours. When you’re ready to enjoy, simply place the Clever Dripper on top of a mug or carafe and the valve will open, releasing the brewed concentrate.
This method offers controlled extraction and a relatively clean cup. I’m not sure if it’s a hugely popular technique, but it's an interesting alternative for those who already own a Clever Dripper. It’s a bit of a niche approach, but it can produce excellent results. Experiment with steep times to find your sweet spot.
DIY Cold Brew Tower: For the Dedicated
For the truly dedicated, building a DIY cold brew tower is a rewarding project. This involves creating a slow-drip system using readily available materials like a plastic water bottle, a coffee filter, and a container to collect the brewed concentrate. The idea is to slowly drip cold water over the coffee grounds, resulting in a very smooth and concentrated brew.
The process is more involved than other methods. You’ll need to create a small hole in the water bottle cap, line it with a coffee filter, and suspend the bottle upside down over a container. Then, slowly drip cold water through the grounds, allowing the concentrate to collect below. The drip rate is crucial – too fast, and you’ll under-extract; too slow, and it will take forever.
This method requires significantly more effort and attention, but the results can be exceptional. The slow-drip process extracts the coffee slowly and evenly, resulting in a very smooth, low-acid concentrate. It’s not for everyone, but if you enjoy tinkering and are willing to put in the time, it’s a truly rewarding experience. It’s a commitment, but one that can yield a truly special cold brew.
Which alternative cold brew method are you most likely to try in 2026?
We covered seven ways to make cold brew without a French press, and we want to hear from you. Whether you are a minimalist brewer or love experimenting with new gear, vote for the method you are most excited to try and let us know in the comments why it caught your eye.
No comments yet. Be the first to share your thoughts!