
Why one ratio doesn't fit every bean
You’ve likely heard the “golden ratio” for cold brew – 1:8 or even 1:15 coffee to water. It’s a widely circulated rule of thumb, and honestly, it’s a place where a lot of cold brew advice falls apart. This ratio likely originated from early experimentation, when dialing in the perfect extraction wasn’t as understood as it is today. To treat it as a universal truth is a mistake.
The biggest problem with a single, fixed ratio is the sheer variability of coffee itself. A light-roast Ethiopian Yirgacheffe will behave drastically differently than a dark-roast Sumatran Mandheling. Bean density, processing method, and even freshness all play a role. What works beautifully for one coffee could result in a weak or bitter brew with another.
I don't believe in a single magic number. You're better off understanding how ratios change the flavor profile so you can adjust based on the specific beans in your kitchen. If it tastes good to you, the ratio is correct.
How roast and grind change the math
Lighter roasts are less soluble. It takes more effort to pull out those floral notes, so I usually use a higher coffee-to-water ratio or a longer steep. Darker roasts are the opposite; they dissolve quickly and turn bitter if you use too much coffee or leave them too long.
Origin also matters. Ethiopian coffees, known for their bright acidity, often benefit from a slightly higher ratio, while Sumatran coffees, with their earthy profiles, might do well with a lower ratio. It's about balancing the inherent characteristics of the bean. Don't be afraid to experiment, but start with the understanding that a brighter bean usually needs a little extra help.
Grind size is equally important, and it’s inextricably linked to your ratio. Counter Culture Coffee recommends a coarse grind for cold brew, similar to what you'd use for a French press. This prevents over-extraction and keeps the brew clean. A grind that’s too fine will lead to muddy, bitter results. If you’re using a finer grind, you’ll likely need to reduce your brew time, or even slightly increase the coffee-to-water ratio to compensate.
Grind size and ratio work together. A coarse grind needs more time or more coffee to reach full strength. If you go finer, you can cut the brew time down, but you have to watch it closely so it doesn't get harsh. I usually stick to coarse to keep the flavor clean.
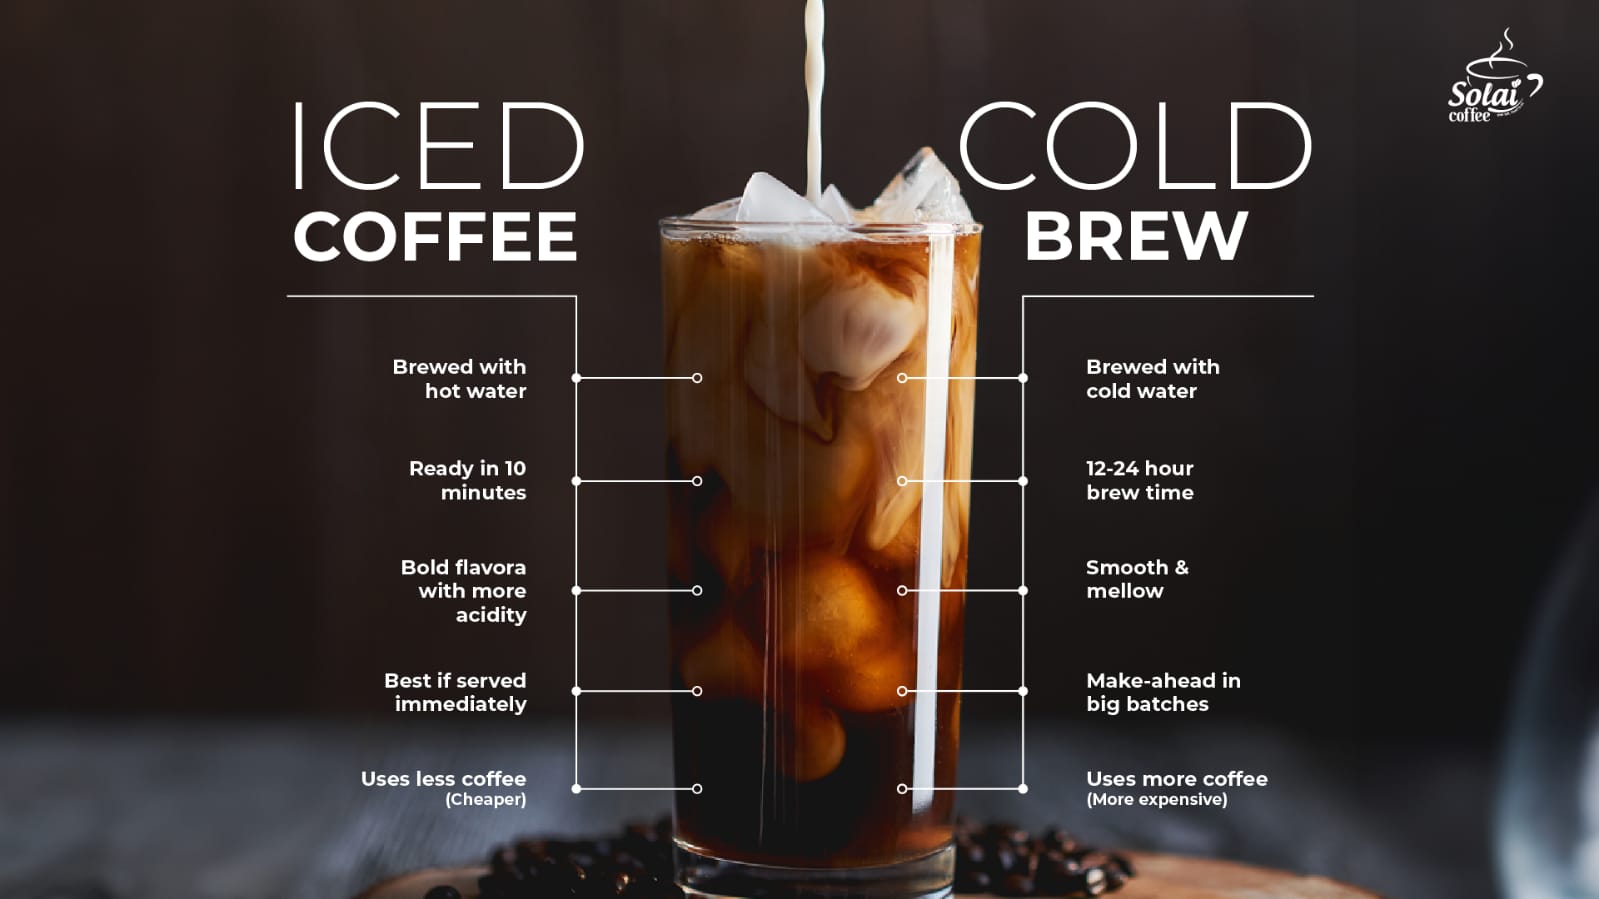
Use filtered water
This is an area often overlooked, but water quality can make or break your cold brew. The minerals present in tap water can significantly affect the extraction process, sometimes in unpredictable ways. Using filtered water is essential. A simple charcoal filter can remove chlorine and other impurities that can mask the coffee’s natural flavors.
The ideal water for cold brew should be clean, odorless, and relatively neutral in taste. While the ideal pH level is debated, avoiding extremely acidic or alkaline water is a good starting point. Room temperature or slightly chilled water is generally recommended, as it promotes a slower, more even extraction.
Don’t underestimate this step. You can have the perfect ratio and grind size, but if your water is subpar, your cold brew will suffer.
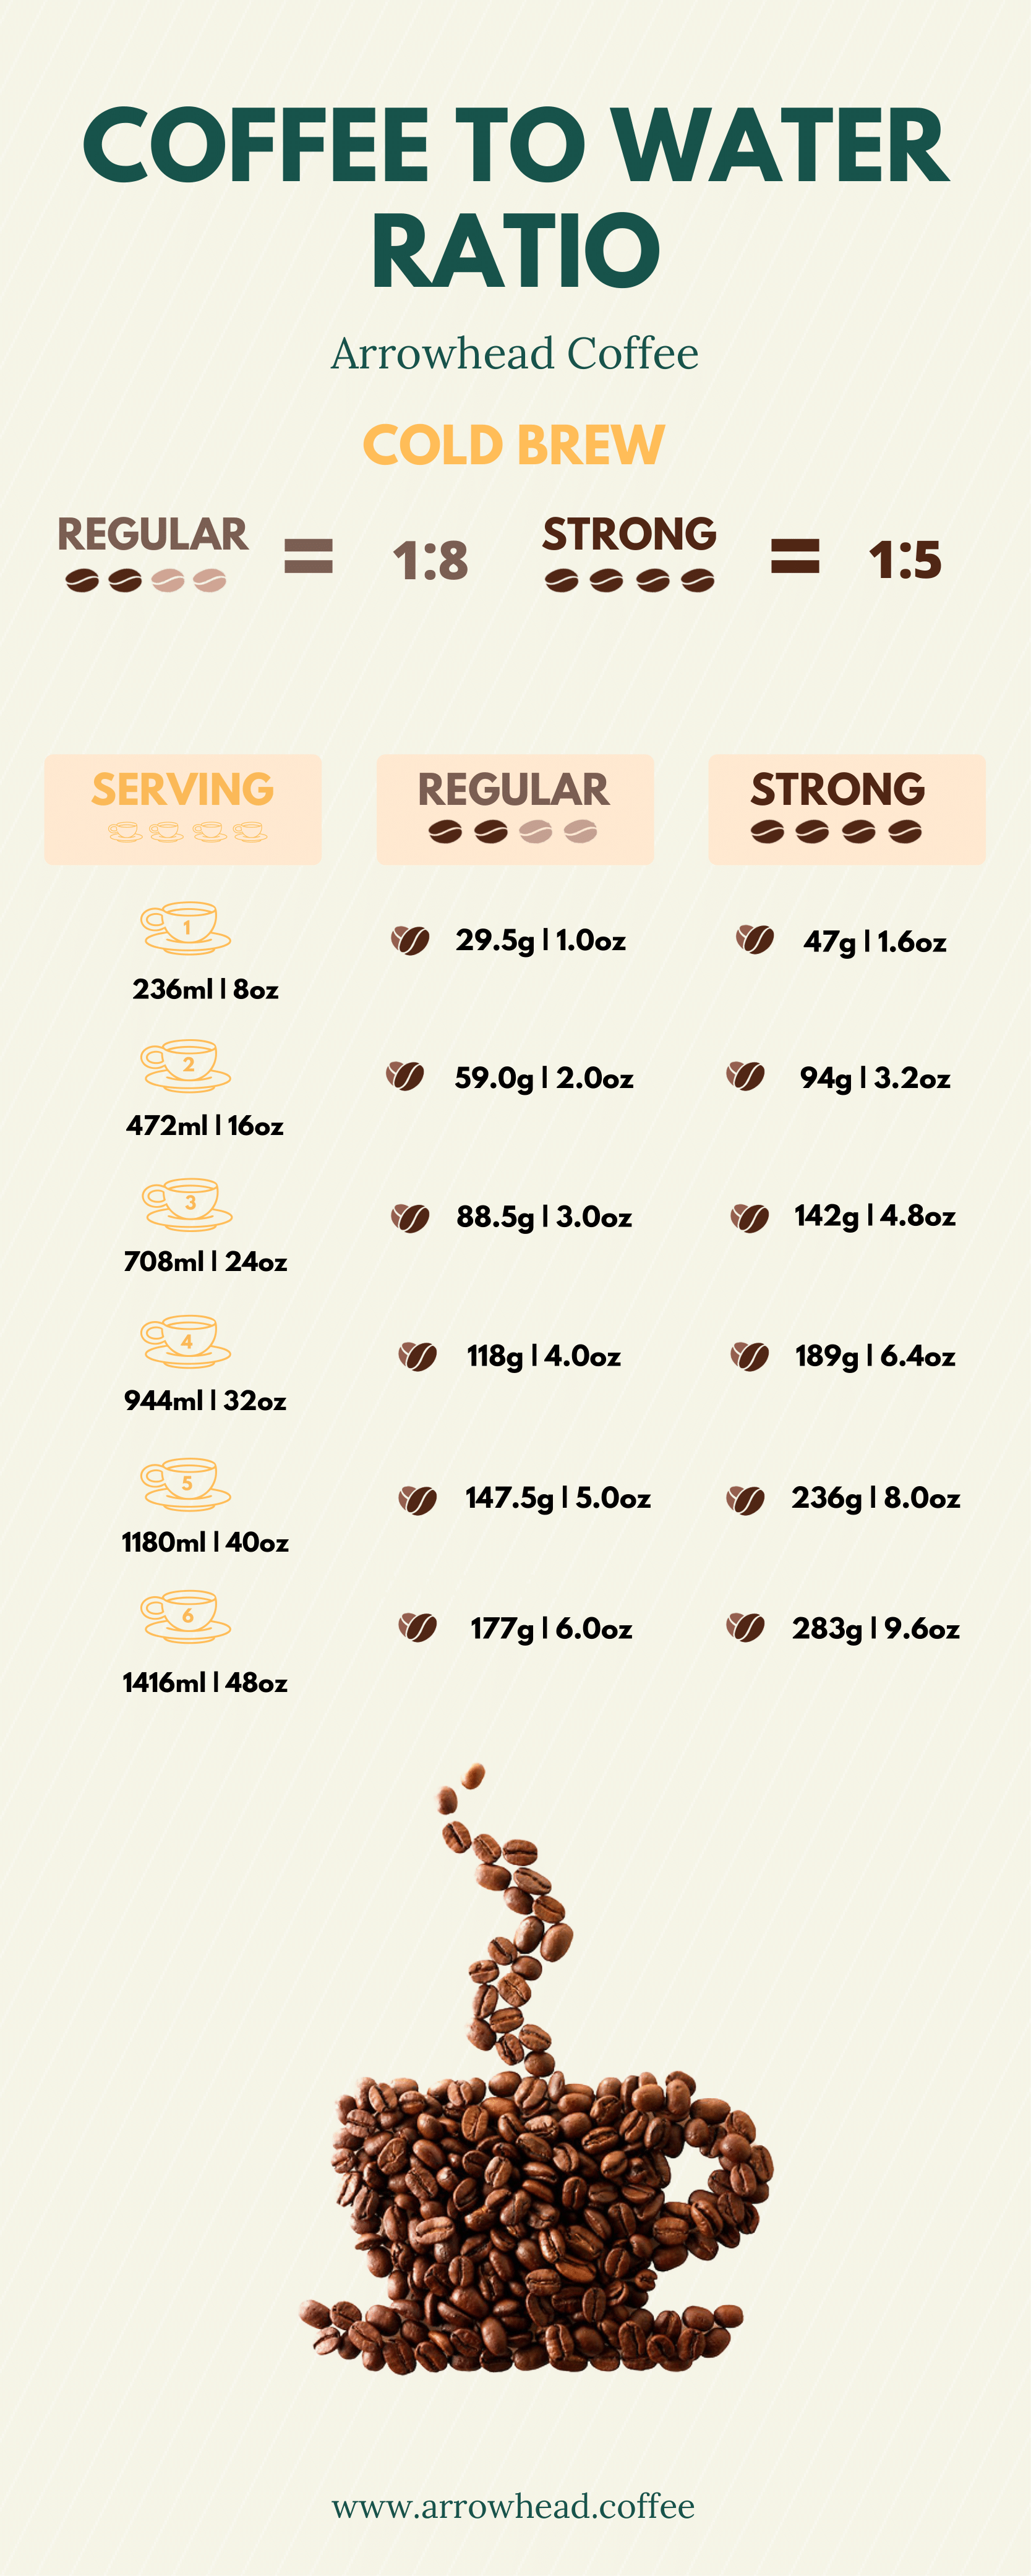
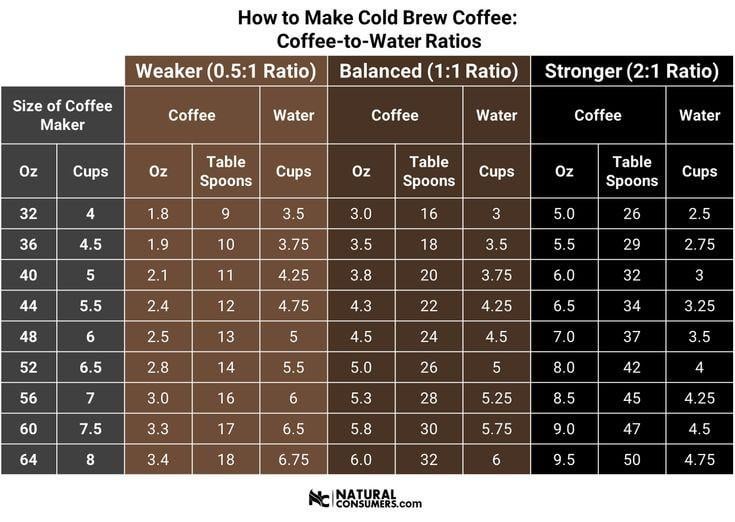
The 1:10 to 1:16 Range Explained
Now let’s talk practical ratios. I recommend starting within the 1:10 to 1:16 coffee-to-water range. A 1:10 ratio (1 part coffee to 10 parts water) will yield a strong concentrate, perfect for those who like their cold brew bold or plan to dilute it significantly for lattes. A 1:16 ratio will produce a more approachable strength, closer to ready-to-drink without needing as much dilution.
For example, if you’re using a light-roast Kenyan coffee, start with a 1:12 or 1:10 ratio. Its delicate flavors might need a little extra encouragement. If you’re using a dark-roast Indonesian coffee, start with a 1:14 or 1:16 ratio to prevent over-extraction. These are just starting points, though.
Remember, these ratios aren’t set in stone. They are guidelines to help you navigate the complex world of cold brew. The goal is to find the ratio that best suits your beans and your palate. Don’t be afraid to experiment and adjust based on your results. This is where Sky Cold Brew's focus on personalization really comes into play.
Brew Time & Ratio Adjustment
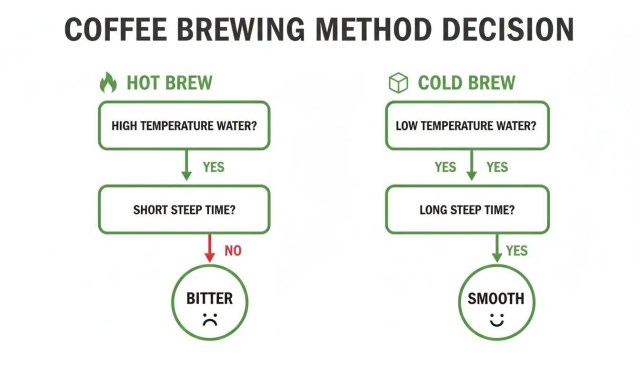
Brew time and ratio have an inverse relationship. If you want to shorten your brew time, you may need to increase your coffee-to-water ratio. Conversely, a longer brew time allows for a lower ratio. This is because extraction happens over time. More coffee means more surface area for extraction, allowing you to achieve a desired strength in a shorter period.
Most batches take 12 to 24 hours. I find 18 hours is usually the sweet spot. If you use a high ratio of coffee, start tasting it early. If you're using less coffee, you'll need the full 24 hours for the flavors to develop.
Taste is the ultimate judge. If your cold brew is weak after 12 hours, try increasing the ratio or extending the brew time. If it’s bitter, reduce the ratio or shorten the brew time. Keep a brewing journal to track your experiments and refine your process. It's the best way to learn.
Strength & Dilution: Finding Your Sweet Spot
Once you’ve brewed your concentrate, it’s time to determine its strength. A good concentrate should be intensely flavorful but not overly bitter. The strength will depend on your chosen ratio and brew time. Taste it! Dilution is key to unlocking the full potential of your cold brew.
For a standard iced coffee, a 1:1 dilution (1 part concentrate to 1 part water) is a good starting point. For lattes or other milk-based drinks, you may want to use a 1:2 or 1:3 dilution. Experiment to find what works best for you. Be careful not to over-dilute, as you’ll lose the rich, complex flavors of the coffee.
Here's a quick guide: Iced Coffee: 1:1 to 1:2 (concentrate:water) Lattes/Cappuccinos: 1:2 to 1:3 * Cold Brew over Ice: 1:1 to 1:4 (adjust to preference)
- Iced coffee: 1:1 or 1:2 concentrate to water
- Lattes/Cappuccinos: 1:2 to 1:3
- Cold Brew over Ice: 1:1 to 1:4 (adjust to preference)
Cold Brew Concentrate Dilution Ratios for Various Serving Types
| Serving Type | Concentrate:Water Ratio | Notes |
|---|---|---|
| Iced Coffee (Standard) | 1:1 | Produces a strong, bold flavor. Good starting point for those new to cold brew. |
| Iced Coffee (Balanced) | 1:2 | A more balanced flavor profile, reducing the intensity of the concentrate. |
| Iced Coffee (Milder) | 1:3 | Creates a lighter, more refreshing iced coffee experience. |
| Latte | 1:1.5 | Balances the strong coffee flavor with milk, creating a classic latte profile. |
| Cold Brew with Milk (Equal Parts) | 1:1 | A robust and creamy combination, ideal for those who enjoy a strong coffee taste with milk. |
| Cold Brew with Milk (Milk Forward) | 1:2 | A smoother, milk-focused drink with a subtle coffee flavor. |
| Cold Brew with Tonic Water | 1:3 | Creates a refreshing and bubbly drink with a balanced coffee and tonic flavor. |
| Cold Brew with Sparkling Water | 1:4 | A light and effervescent beverage, perfect for a subtle coffee experience. |
Illustrative comparison based on the article research brief. Verify current pricing, limits, and product details in the official docs before relying on it.
Advanced: Ratio Tweaks for Specific Methods
Different cold brew methods may require slight ratio adjustments. Immersion brewing, like using a French press or a Toddy system, typically allows for a wider range of ratios. Slow-drip systems, on the other hand, often benefit from a slightly higher ratio due to the slower, more controlled extraction.
The surface area of the coffee grounds also plays a role. A larger surface area (achieved with a coarser grind) generally requires a longer brew time and potentially a lower ratio. A smaller surface area (a finer grind) requires a shorter brew time and potentially a higher ratio. It's all about maximizing extraction without overdoing it.
Using a Toddy system, with its felt filter, often allows for a slightly lower ratio because the filter prevents fines from passing through, resulting in a cleaner brew. A French press, with its metal filter, might benefit from a slightly higher ratio to compensate for the presence of some fines.

No comments yet. Be the first to share your thoughts!