
Beyond Iced Coffee: Why Cold Brew Is Different (and Why You Should Care)
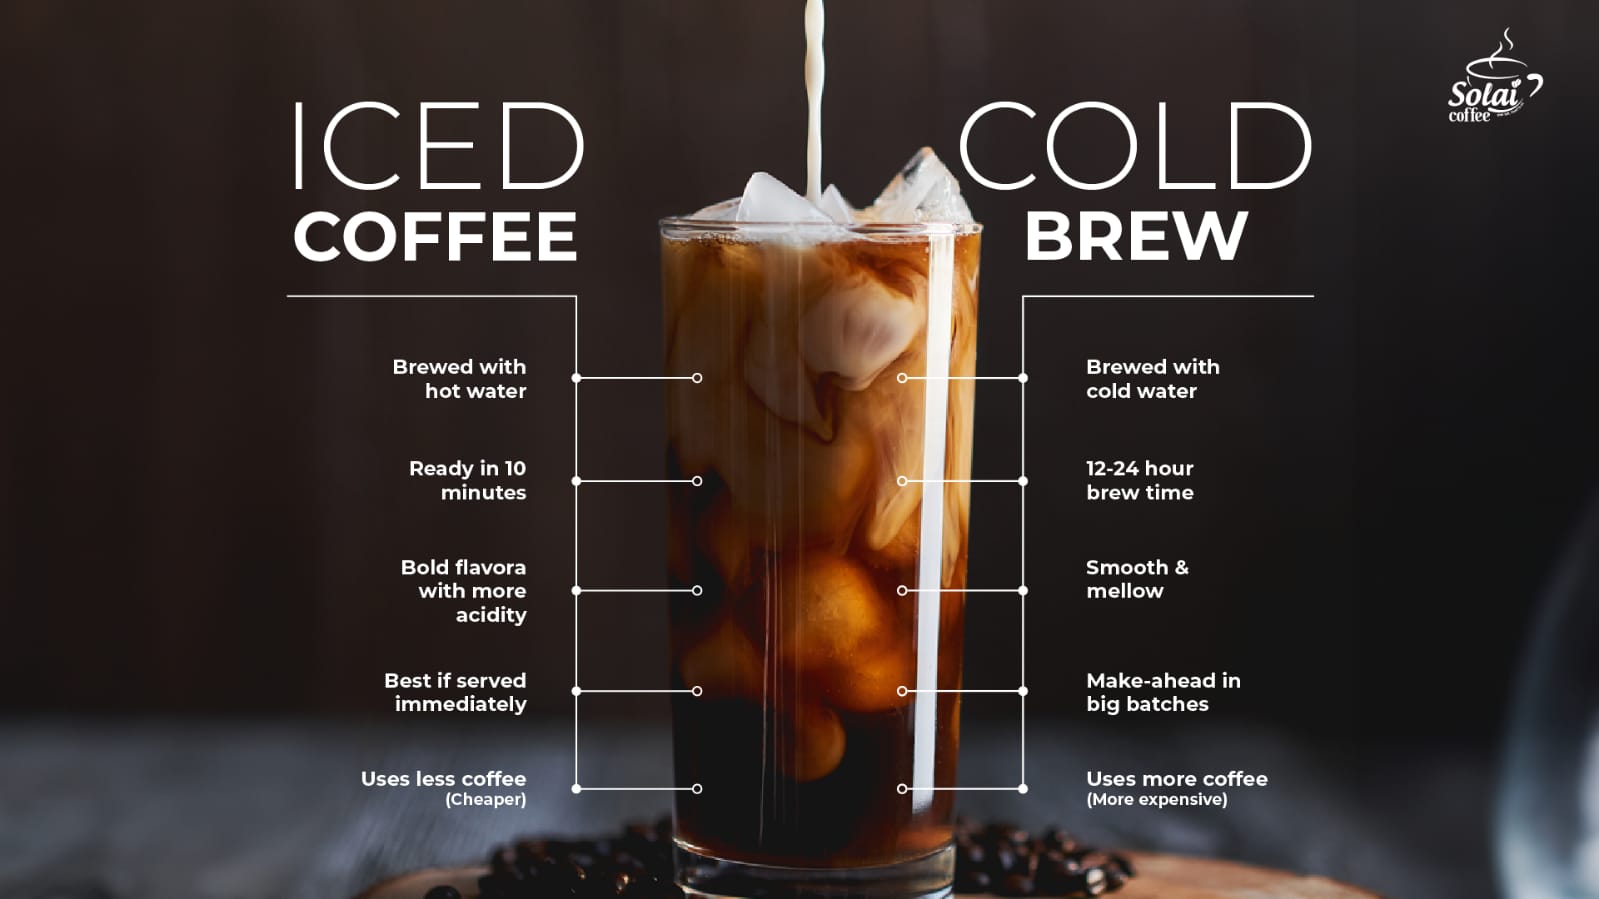
Let’s be honest: we’ve all been there. You want coffee, it’s hot out, so you throw some ice into a cup of regular brewed coffee. It waters down quickly, gets bitter, and just isn’t quite satisfying. That’s where cold brew steps in, and it’s a game changer. It's not just iced coffee; it's a fundamentally different process that unlocks a smoother, naturally sweeter flavor.
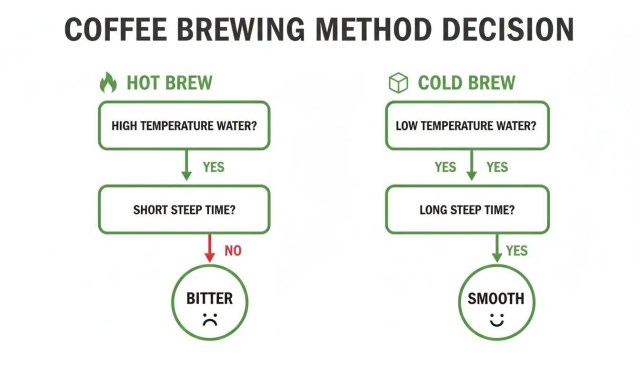
The key difference lies in the extraction method. Hot brewing forces hot water through coffee grounds, rapidly extracting oils and acids. Cold brew, on the other hand, uses time and cold water. This slow, cold extraction pulls out different compounds, resulting in lower acidity and a less bitter taste. You're essentially coaxing the flavor out, rather than shocking it.
Historically, cold brew has roots in Kyoto-style drip coffee, dating back to the 17th century, but it’s really gained traction in the US over the last decade. It started as a specialty coffee shop offering, but now you can find it everywhere from Starbucks to your local grocery store. But the commercially available stuff is…variable. Brewing at home lets you control the quality and customize the flavor to your exact liking.
For anyone who finds regular coffee harsh on their stomach, or just wants a more mellow experience, cold brew is worth exploring. It really is a different drink – and one I think most coffee lovers will appreciate. I've found it’s consistently more enjoyable, especially on warmer days, and it's become my go-to method for a daily caffeine boost.
The Grind Is Everything: Getting the Texture Right for Cold Brew
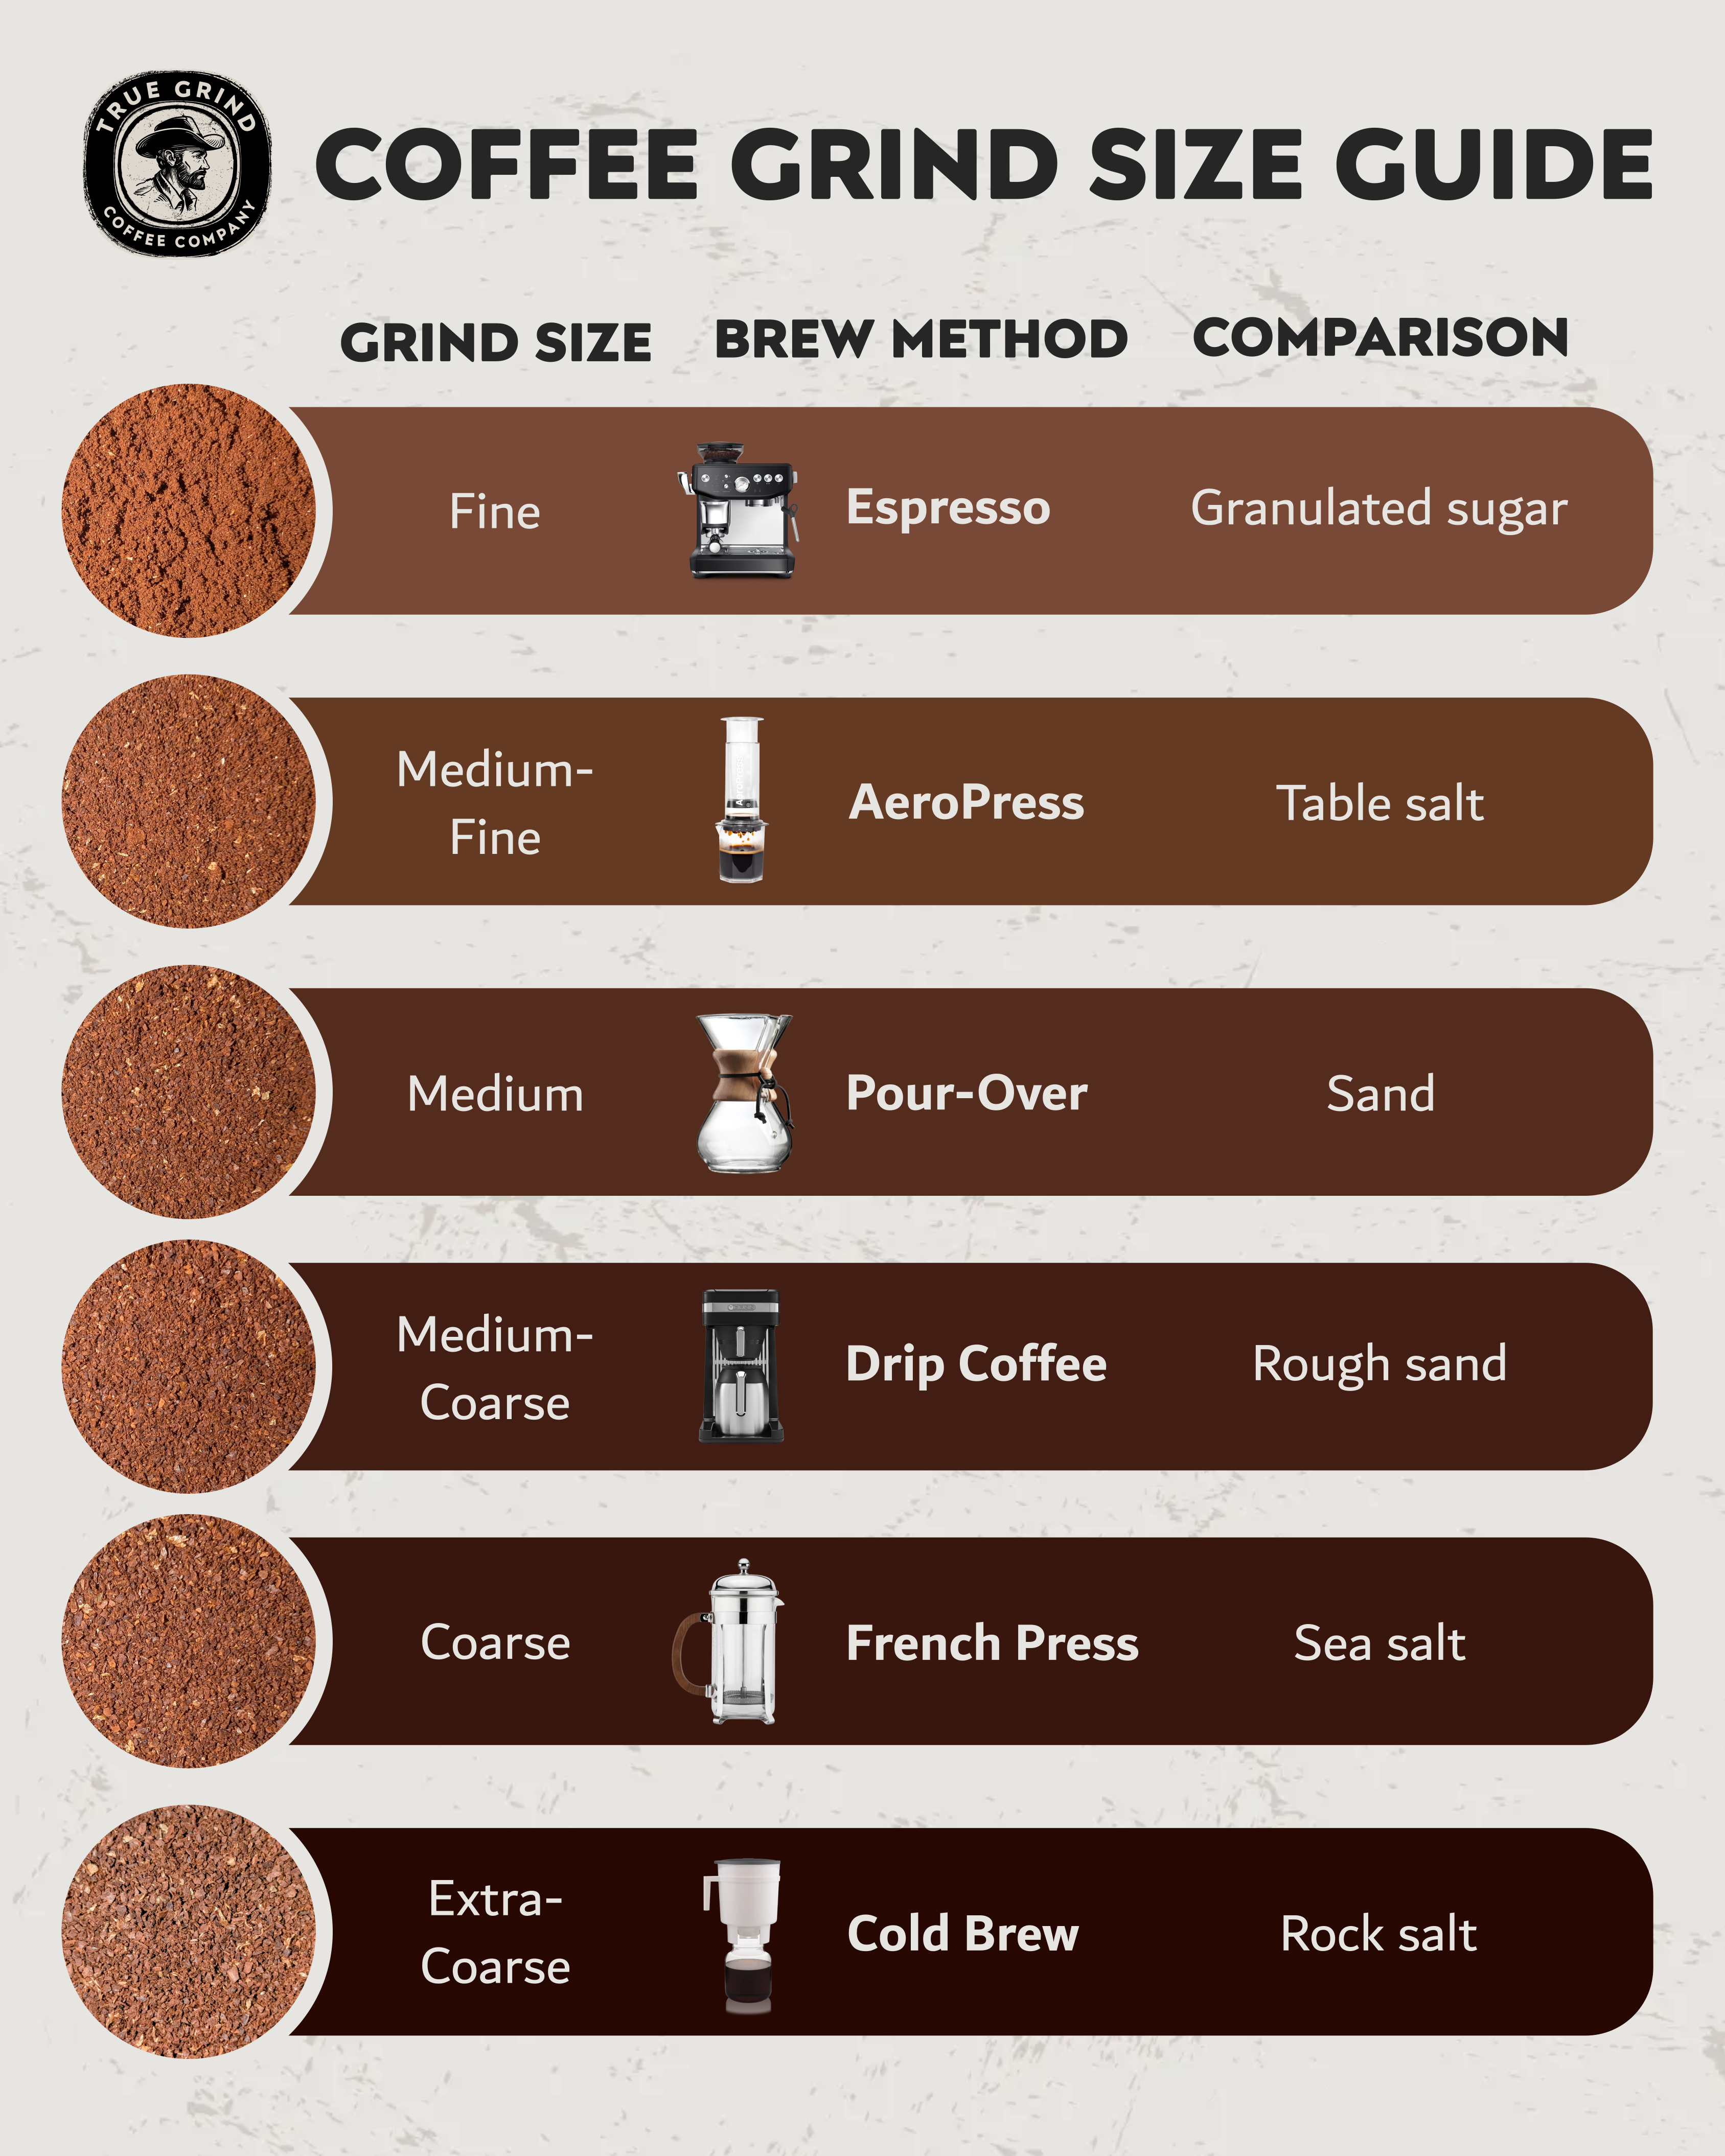
If you take only one thing away from this guide, let it be this: grind size matters. Seriously. Getting the grind right is the single most important factor in making good cold brew. Too fine, and you’re looking at a muddy, over-extracted mess that tastes bitter and unpleasant. Too coarse, and you’ll end up with weak, under-extracted coffee.
Think about it like making tea. You wouldn’t use powdered tea to steep, would you? You want larger particles that allow for a more controlled extraction. For cold brew, you’re aiming for a grind consistency similar to coarse sea salt or even cornmeal. You should be able to see distinct particles, not a fine powder.
Pre-ground coffee is a gamble. Most grocery store pre-grounds are too fine for cold brew. Investing in a burr grinder – not a blade grinder – is absolutely worth the upfront cost. Burr grinders produce a consistent grind size, which is crucial for even extraction. Yes, a good burr grinder can cost $100 or more, but it will pay for itself in better-tasting coffee and saved money from not buying bad pre-ground.
I've experimented with different grinders over the years, and my current recommendation for a home brewer is the Baratza Encore. It's reliable, affordable, and consistently delivers a great coarse grind. Don't underestimate the impact of a proper grind – it's the foundation of a perfect cold brew.
7 Cold Brew Methods Tested: From Simple Immersion to Fancy Gadgets
There are a surprising number of ways to make cold brew at home. I’ve tested quite a few, and here’s a breakdown of seven methods, ranging from the simplest to the more specialized. Each has its own pros and cons, and the best method for you will depend on your budget, equipment, and desired level of control.
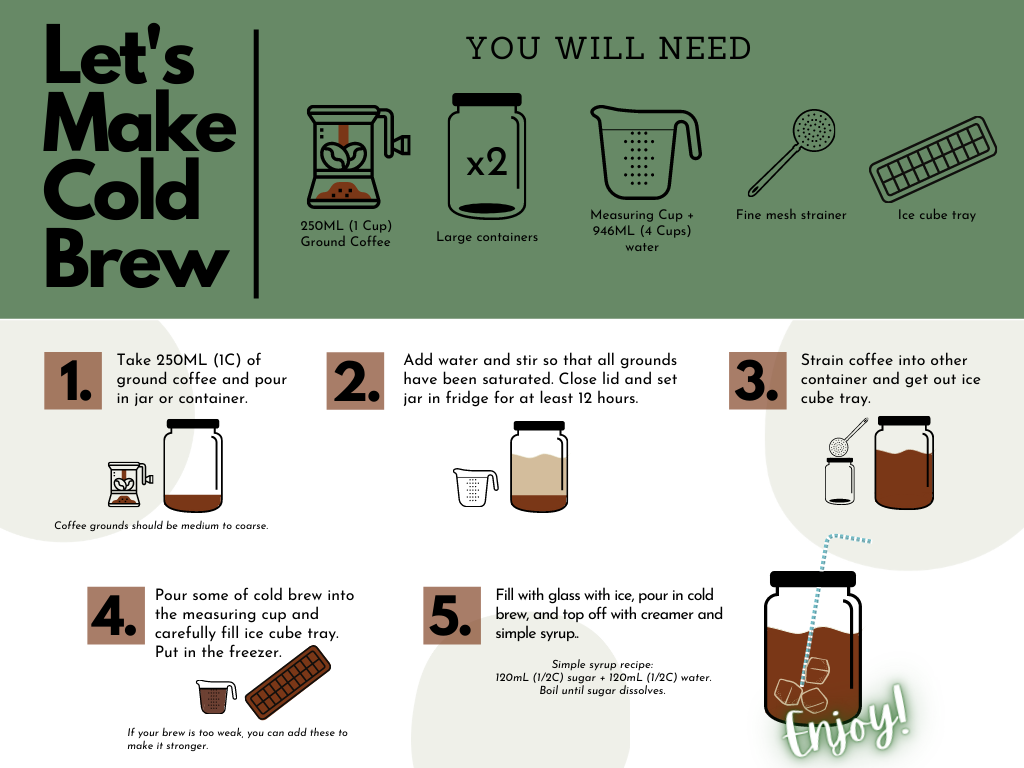
1. Basic Immersion: This is the most accessible method. You simply combine coarse-ground coffee with water in a container and let it steep. Equipment: Large jar or container, filter (cheesecloth, paper filter, or nut milk bag). Instructions: Combine coffee and water (see ratio section). Steep 12-24 hours. Filter. Pros: Simple, inexpensive. Cons: Can be messy, filtering can be slow. Rating: 4/5
2. Toddy System: The Toddy is a dedicated cold brew system with a felt filter. Equipment: Toddy brewer, filters. Instructions: Follow Toddy instructions. Pros: Produces a very clean brew, reusable filter. Cons: Relatively expensive, can be bulky. Rating: 4.5/5
3. French Press: A French press can double as a cold brew maker. Equipment: French Press. Instructions: Add coffee and water to the French press. Steep 12-24 hours. Press. Pros: Convenient, easy cleanup. Cons: Can produce some sediment, requires a good quality French press. Rating: 3.5/5
4. Clever Dripper: Similar to a pour-over, but with a valve that holds the coffee until you’re ready to release it. Equipment: Clever Dripper, filters. Instructions: Add coffee and water. Steep 12-24 hours. Release valve. Pros: Clean brew, good control. Cons: Requires filters, can be a bit fiddly. Rating: 4/5
5. Mason Jar: Similar to basic immersion, but using a mason jar. Equipment: Mason jar, filter. Instructions: Combine coffee and water in mason jar. Steep 12-24 hours. Filter. Pros: Inexpensive, readily available. Cons: Can be messy, filtering can be slow. Rating: 3/5
6. Japanese Iced Coffee: Technically a flash-chill method, but similar in spirit. Brew hot coffee directly over ice. Equipment: Pour-over device, ice. Instructions: Brew hot coffee directly onto ice. Pros: Quick, refreshing. Cons: Not true cold brew, can be watery. Rating: 2.5/5
7. Cold Brew Bags: Pre-portioned bags designed for cold brew. Equipment: Cold brew bags, container. Instructions: Add bags to water. Steep 12-24 hours. Remove bags. Pros: Convenient, mess-free. Cons: Can be expensive, quality varies. Rating: 3/5
- Basic Immersion (4/5)
- Toddy System (4.5/5)
- French Press (3.5/5)
- Clever Dripper (4/5)
- Mason Jar (3/5)
- Japanese Iced Coffee (2.5/5)
- Cold Brew Bags (3/5)
Cold Brew Coffee Method Comparison - 2024
| Method | Equipment Cost (USD) | Brewing Time | Ease of Use (1-5, 5=Easiest) | Flavor Profile | Overall Rating (1-5 Stars) |
|---|---|---|---|---|---|
| Immersion (Standard) | $20 - $50 | 18-24 Hours | 3 | Smooth, balanced, low acidity, chocolatey notes | 4.5 |
| Immersion (Toddy System) | $60 - $120 | 12-24 Hours | 2 | Very smooth, clean, minimal sediment, consistent results | 4.7 |
| Slow Drip (Kyoto Style) | $150 - $300+ | 24-36 Hours | 2 | Bright, floral, delicate, tea-like clarity | 4.0 |
| Cold Brew Bag | $10 - $25 | 12-18 Hours | 4 | Similar to immersion, but easier cleanup, can be slightly less consistent | 4.0 |
| Mason Jar Method | $5 - $15 | 16-20 Hours | 5 | Simple, accessible, good for small batches, can require more careful filtering | 3.5 |
| French Press Cold Brew | $30 - $60 | 12-16 Hours | 3 | Full-bodied, can have some sediment if not filtered well, robust flavor | 3.8 |
| Automatic Cold Brew Maker | $100 - $250 | 30-60 Minutes (plus steeping) | 4 | Convenient, consistent, often includes built-in filtration, can be less nuanced | 4.2 |
Data sourced from AI research — verify before making decisions
Dialing In Your Ratio: Finding the Sweet Spot for Strength and Flavor
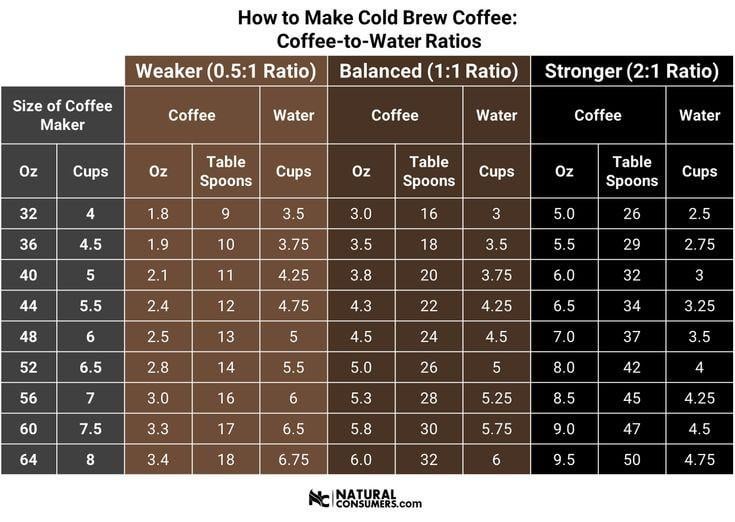
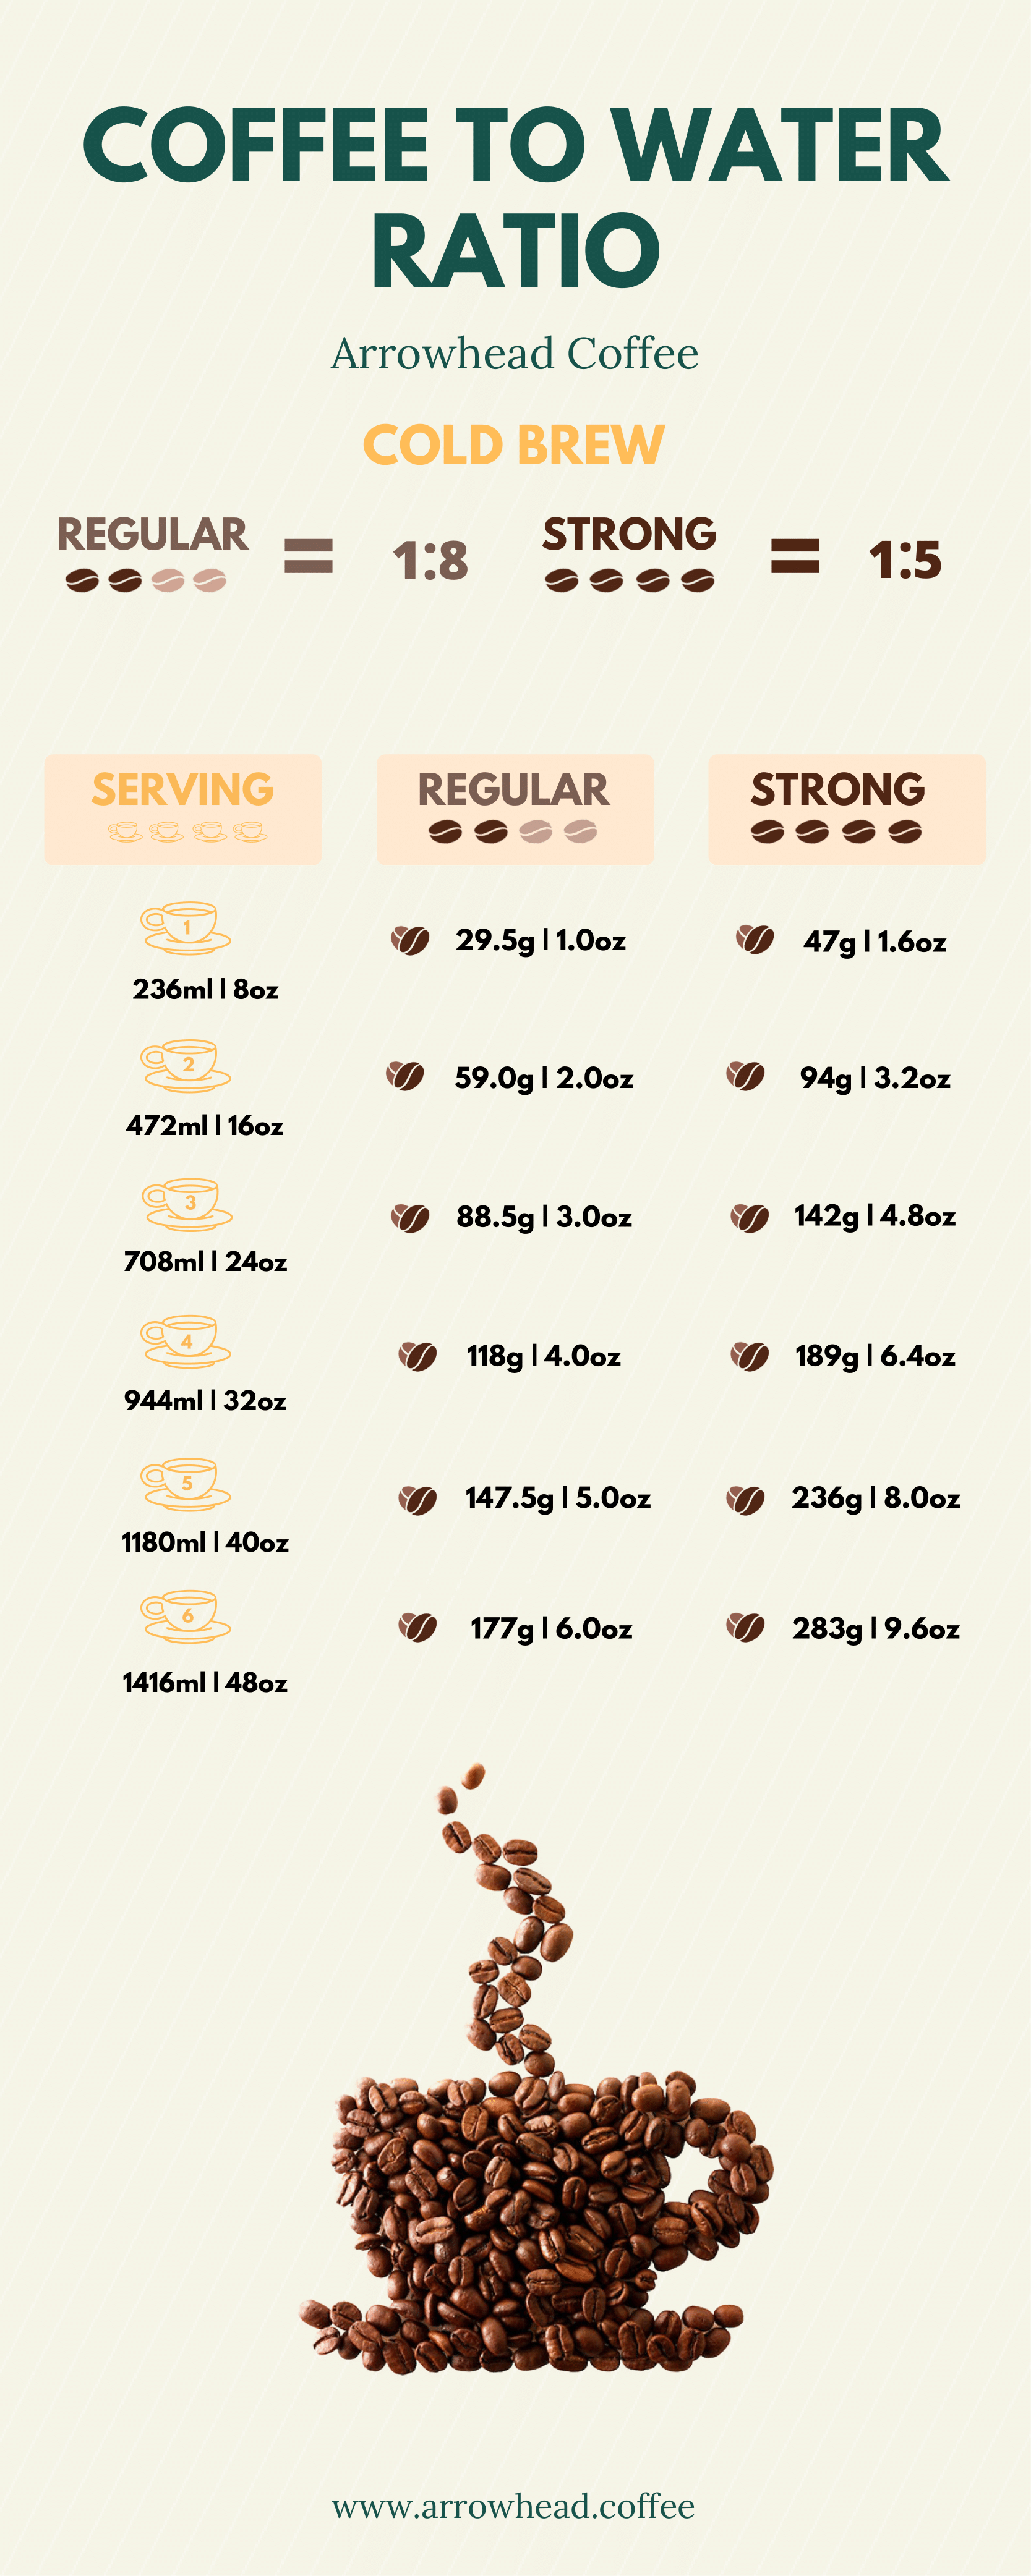
Once you’ve got your grind dialed in, the next crucial step is finding the right water-to-coffee ratio. This is where personal preference really comes into play. A common starting point is a 1:8 ratio (1 part coffee to 8 parts water), but I’ve found that a 1:6 ratio produces a more concentrated brew that I prefer.
Experimenting is key. If your cold brew is too weak, use less water (e.g., 1:5). If it’s too strong, use more water (e.g., 1:10). Don’t be afraid to adjust until you find the sweet spot for your palate. Remember, you can always dilute a concentrate with water or milk, but you can’t easily fix a brew that’s too weak.
I typically start with a 1:6 ratio and steep for 18-20 hours in the refrigerator. I don’t bother with a "bloom’ – adding a small amount of water to the grounds to release CO2 – as I haven"t noticed a significant difference in the final result. After steeping, I filter it and store the concentrate in the fridge. It's that simple.
Steeping Time: How Long Is Too Long (and What Happens When It Is?)
The research suggests a steeping time between 12 and 48 hours, and that holds true in my experience. Shorter steeps (under 12 hours) will result in under-extracted coffee that tastes sour and weak. Longer steeps (over 24 hours) can lead to over-extraction, resulting in bitterness. The sweet spot, for me, is usually around 18-20 hours.
I’ve experimented with steeping times up to 48 hours, and while it does produce a very strong concentrate, it also develops a noticeable bitterness. The flavor profile shifts – it loses some of the brighter notes and becomes more…robust. It’s not necessarily bad, but it’s not my preference.
Refrigerator temperature plays a role. If your fridge is warmer, the extraction will happen faster. If it’s colder, it will take longer. I recommend using a thermometer to check your fridge temperature and adjusting the steeping time accordingly. A consistent temperature is ideal, aiming for around 40°F (4°C).
Filtering Like a Pro: From Cheesecloth to Specialized Filters
Filtering is the final step in the cold brew process, and it’s important to do it right. The goal is to remove all the coffee grounds, leaving you with a clean, sediment-free concentrate. You have several options when it comes to filters: cheesecloth, paper filters, and metal filters.
I’m not a fan of cheesecloth. It’s messy, doesn’t filter very well, and often leaves a lot of sediment in the final brew. Paper filters (like those used in pour-over coffee makers) are a better option, but they can be slow and require careful handling. Metal filters are reusable and produce a clean brew, but they can be more expensive.
Regardless of which filter you choose, make sure to rinse it thoroughly with cold water before using it. This removes any paper taste (for paper filters) or residual oils (for metal filters). A slow, gentle filtering process is best – don’t force it. Patience is key to achieving a clear, smooth cold brew.
Beyond Black: Cold Brew Recipes to Elevate Your Coffee Game
Cold brew is incredibly versatile. While it’s delicious on its own, it also serves as a fantastic base for a variety of coffee drinks. Here are a few of my favorite recipes to get you started.
Cold Brew Latte: Combine 1 part cold brew concentrate with 1 part milk (dairy or non-dairy). Add ice and sweeten to taste. Simple, classic, and always satisfying.
Vanilla Sweet Cream Cold Brew: Mix 2 tablespoons vanilla syrup with 1/4 cup heavy cream. Pour over ice, then add cold brew concentrate. Top with the vanilla sweet cream. A sweet and decadent treat.
Mocha Cold Brew: Combine 1 part cold brew concentrate with 1 part chocolate syrup. Add milk and ice. For the chocolate lovers.
Cold Brew Tonic: Combine 1 part cold brew concentrate with 3 parts tonic water. Add ice and a slice of citrus. A refreshing and surprisingly delicious combination.
Cold Brew Cocktail: Combine 2 oz cold brew concentrate with 1 oz bourbon or rum. Add ice and a splash of simple syrup. *A sophisticated coffee cocktail.
- Cold Brew Latte: 1 part concentrate + 1 part milk + ice
- Vanilla Sweet Cream Cold Brew: Vanilla syrup + heavy cream + ice + concentrate
- Mocha Cold Brew: Concentrate + chocolate syrup + milk + ice
- Cold Brew Tonic: Concentrate + tonic water + ice + citrus
- Cold Brew Cocktail: Concentrate + bourbon/rum + ice + simple syrup
Essential Cold Brew Gear
- Baratza Encore Conical Burr Coffee Grinder - A consistently recommended entry-level burr grinder for achieving a coarse, consistent grind essential for cold brew. Avoid blade grinders! Buy on Amazon
- Toddy Cold Brew System - A classic immersion cold brew system known for its ease of use and consistently smooth results. Includes a glass carafe and reusable filter. Buy on Amazon
- Hario Mizudashi Cold Brew Coffee Pot - A simple and elegant immersion brewer. Made of heat-resistant glass, it's easy to clean and produces a clean-tasting cold brew. Buy on Amazon
- OXO Brew Compact Cold Brew Coffee Maker - A convenient all-in-one system with a built-in filter. Designed for easy brewing and pouring. Buy on Amazon
- Coffee Bean & Tea Leaf Cold Brew Reserve, Sumatra - Pre-ground Sumatra beans are a popular choice for cold brew due to their low acidity and rich, earthy flavors. Buy on Amazon
- Reusable Stainless Steel Filter (Fine Mesh) - For use with mason jars or other DIY setups. Ensures a clean brew without paper filter taste. Look for a fine mesh to prevent sediment. Buy on Amazon
- GrowlerWerks uKeg Nitro Cold Brew Dispenser - Keep your cold brew fresh and carbonated with this insulated stainless steel growler with a nitro charging system. Buy on Amazon
Cold Brew and Your Health: What the Science Says
One of the biggest benefits of cold brew is its lower acidity compared to hot-brewed coffee. Studies have shown that cold brew can contain up to 67% less acid, making it a good choice for people who suffer from gastritis or acid reflux. The cold-water extraction process minimizes the production of irritating chlorogenic acids, while still preserving the caffeine and flavor.
There's also emerging research suggesting that cold brew may have benefits for those concerned about diabetes. It contains compounds like trigonelline, which may help increase insulin sensitivity. However, it’s important to note that this research is still ongoing, and more studies are needed to confirm these findings. I’m not a medical professional, so I can’t offer medical advice.
Ultimately, cold brew is a delicious and potentially healthier way to enjoy your daily caffeine fix. It's a great option for those who want a smoother, less acidic coffee experience. While it's not a miracle cure, it can be a part of a healthy lifestyle.
No comments yet. Be the first to share your thoughts!